THIS IS THE PROJECT ARCHIVE #
THESE ARE NOT THE CURRENT PROJECTS #
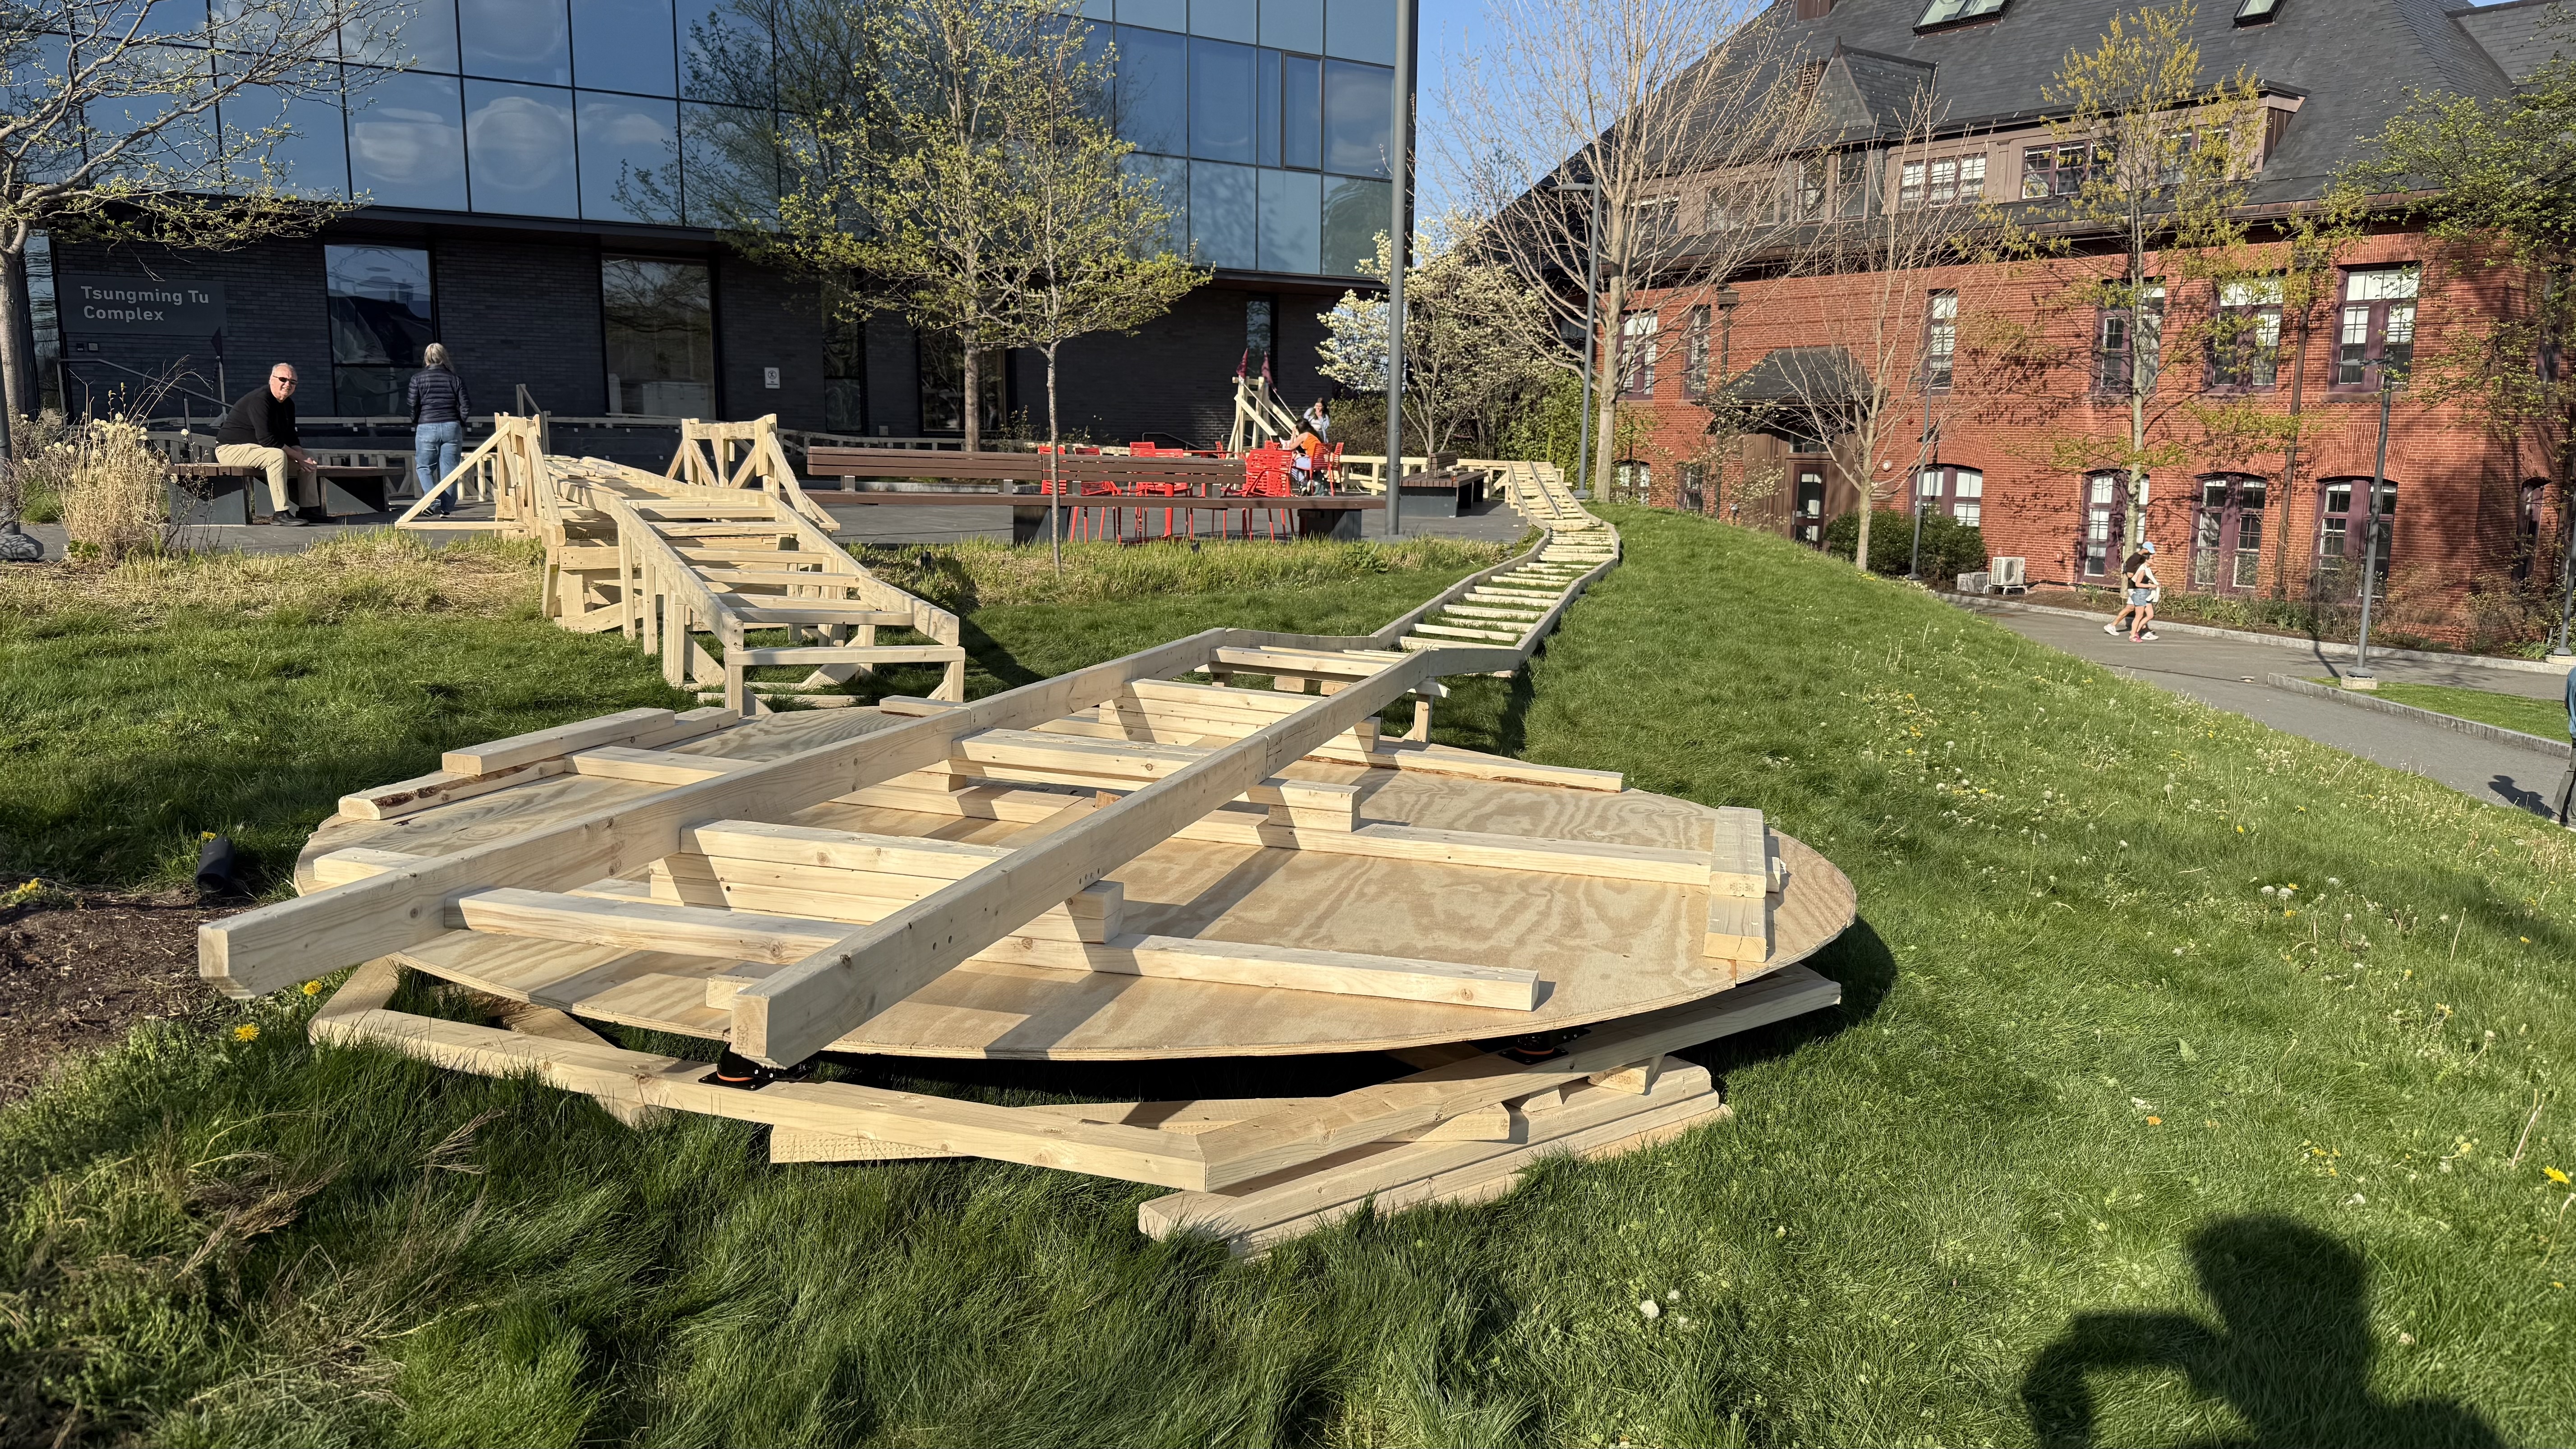
Px: The TTC cog railway #
A pastoral journey in 10 parts #
Build a cog railway to allow local denizens to tour the TTC patio.
We will split the class into 10 teams of 3 or 4 people. Each team will complete 1 of the 10 subprojects below. Together, we will have a cog railway which we will charge your friends to ride.
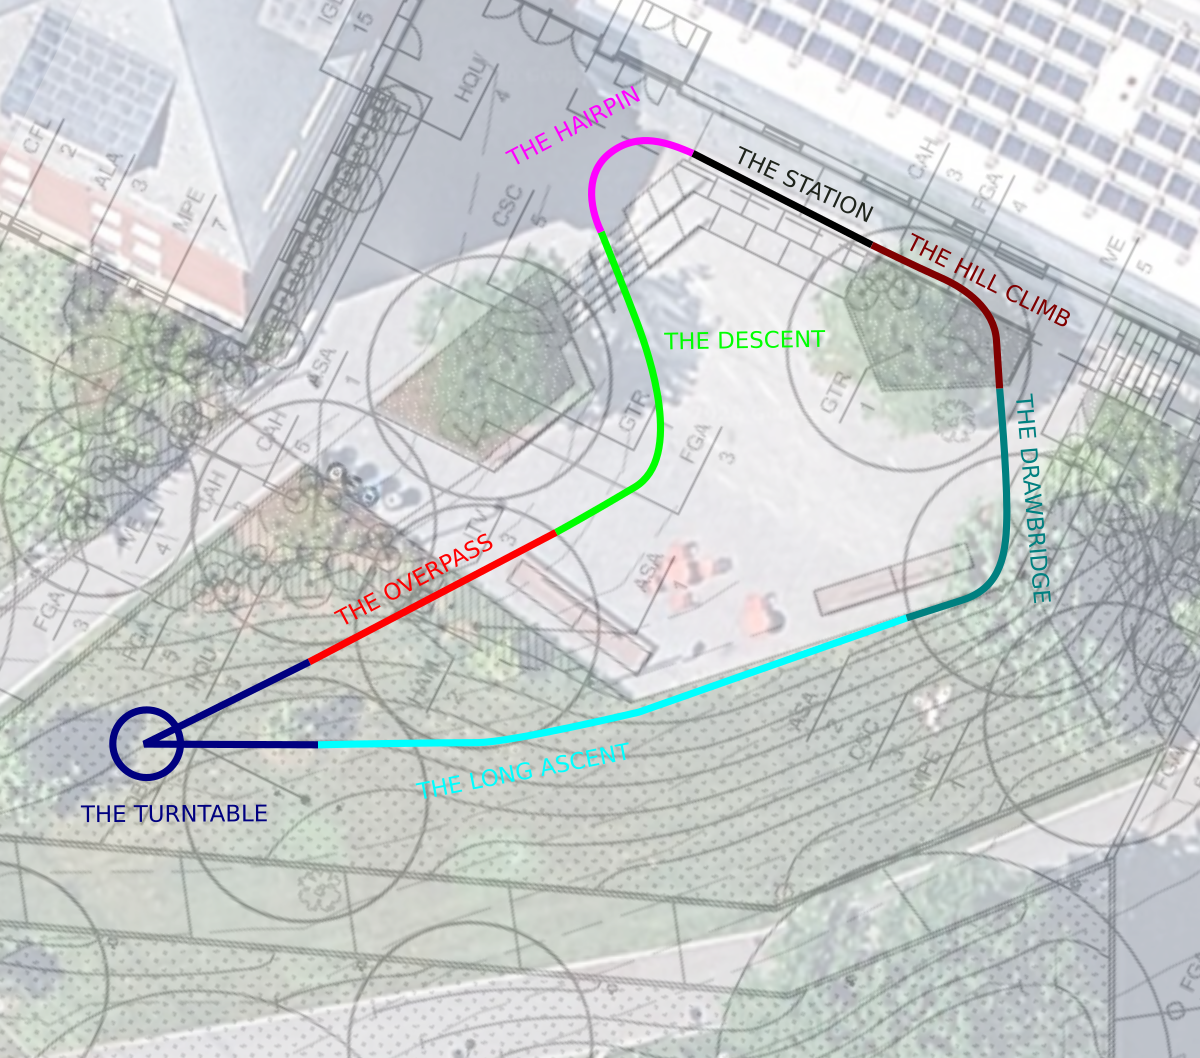
THE STATION #
- Build a level section of track that allows people to board the railway safely. This will likely require stairs and railings. This section probably requires a rack to allow the engine cog to accelerate the train.
THE HAIRPIN #
- Build a corner that connects the station to the descent smoothly. Work with the engine team to insure that the train can make it around the corner. This section probably requires a rack to allow the engine cog to accelerate the train.
THE DESCENT #
- Build a section of track that allows the train to descend the stairs. The slope should be as shallow as possible while staying within 24 inches of the ground.
- At the bottom of the descent, the train should be aimed toward the overpass. Coordinate with the overpass team to make sure that works.
THE OVERPASS #
- Build a structure that allows the train to pass over the garden bed without touching the plants. The span is around 14 feet. This section may require a rack to allow the train to climb up the overpass, but you might be able to avoid that if you get the descent team to deliver the train at the right height. Note that the overpass needs to be able to carry the engine, the passenger car, and the passengers without collapsing.
THE TURNTABLE #
- Build a structure that can rotate the train almost 180 degrees and align the train with a second set of tracks. Coordinate with the overpass team to make sure the structure is high enough that the train doesn’t shoot off the end. Note that the turntable should be able to rotate the engine and the passenger car at the same time.
THE LONG ASCENT #
- Build a long, nearly straight section of track from the turntable to the drawbridge. Build the structure on top of the hill, not on the side of it. This section probably requires a rack in some section to allow the train to ascend.
THE DRAWBRIDGE #
- Build a corner and a straight, level section of track. The straight section should be a drawbridge, so that people can still enter the patio while construction is going on.
THE HILL CLIMB #
- Build a curve and a straight section of track that connects the drawbridge back to the station. This section definitely requires a rack in some section to allow the train to ascend.
THE ENGINE #
- Build a pedal-powered vehicle that can tow a passenger car around the railway loop. The engine team is charged with specifying the details of the cog system.
THE PASSENGER CAR #
- Build a railway car that can be towed around the railway loop while carrying 0-4 passengers. It should be able to fit around all the corners and not derail.
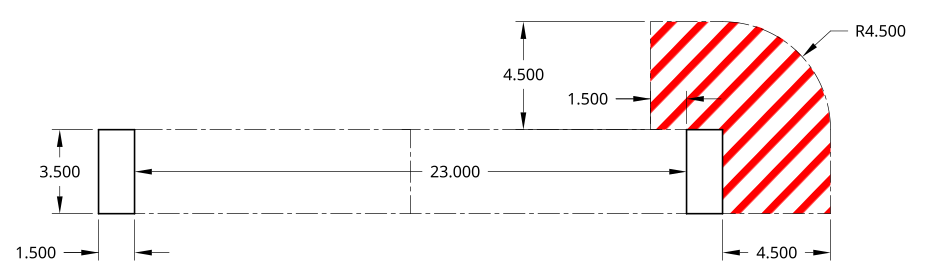
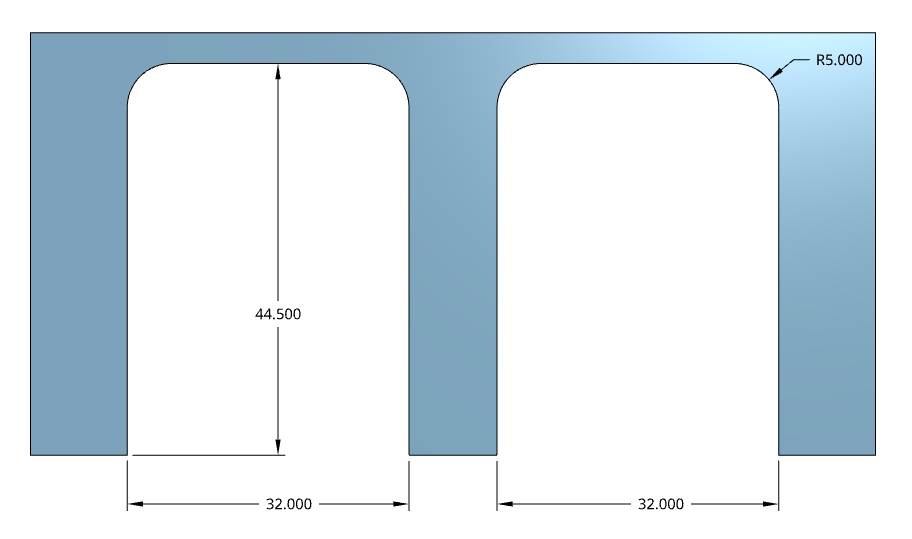
Track specification #
The image below shows the cross section of the track that you must build. The red hatched area shows the area where wheels should be able to pass through. Do not put anything in the red hatched area.
You will be given: #
- Access to a large pile of 1x4’s, 2x4’s, 2x3’s and 1/2 inch plywood
- Other materials or parts as needed
A few notes about safety: #
- At no point should passengers’ feet be more than 30 inches off the ground. This means the rails should remain within 24 inches of the ground.

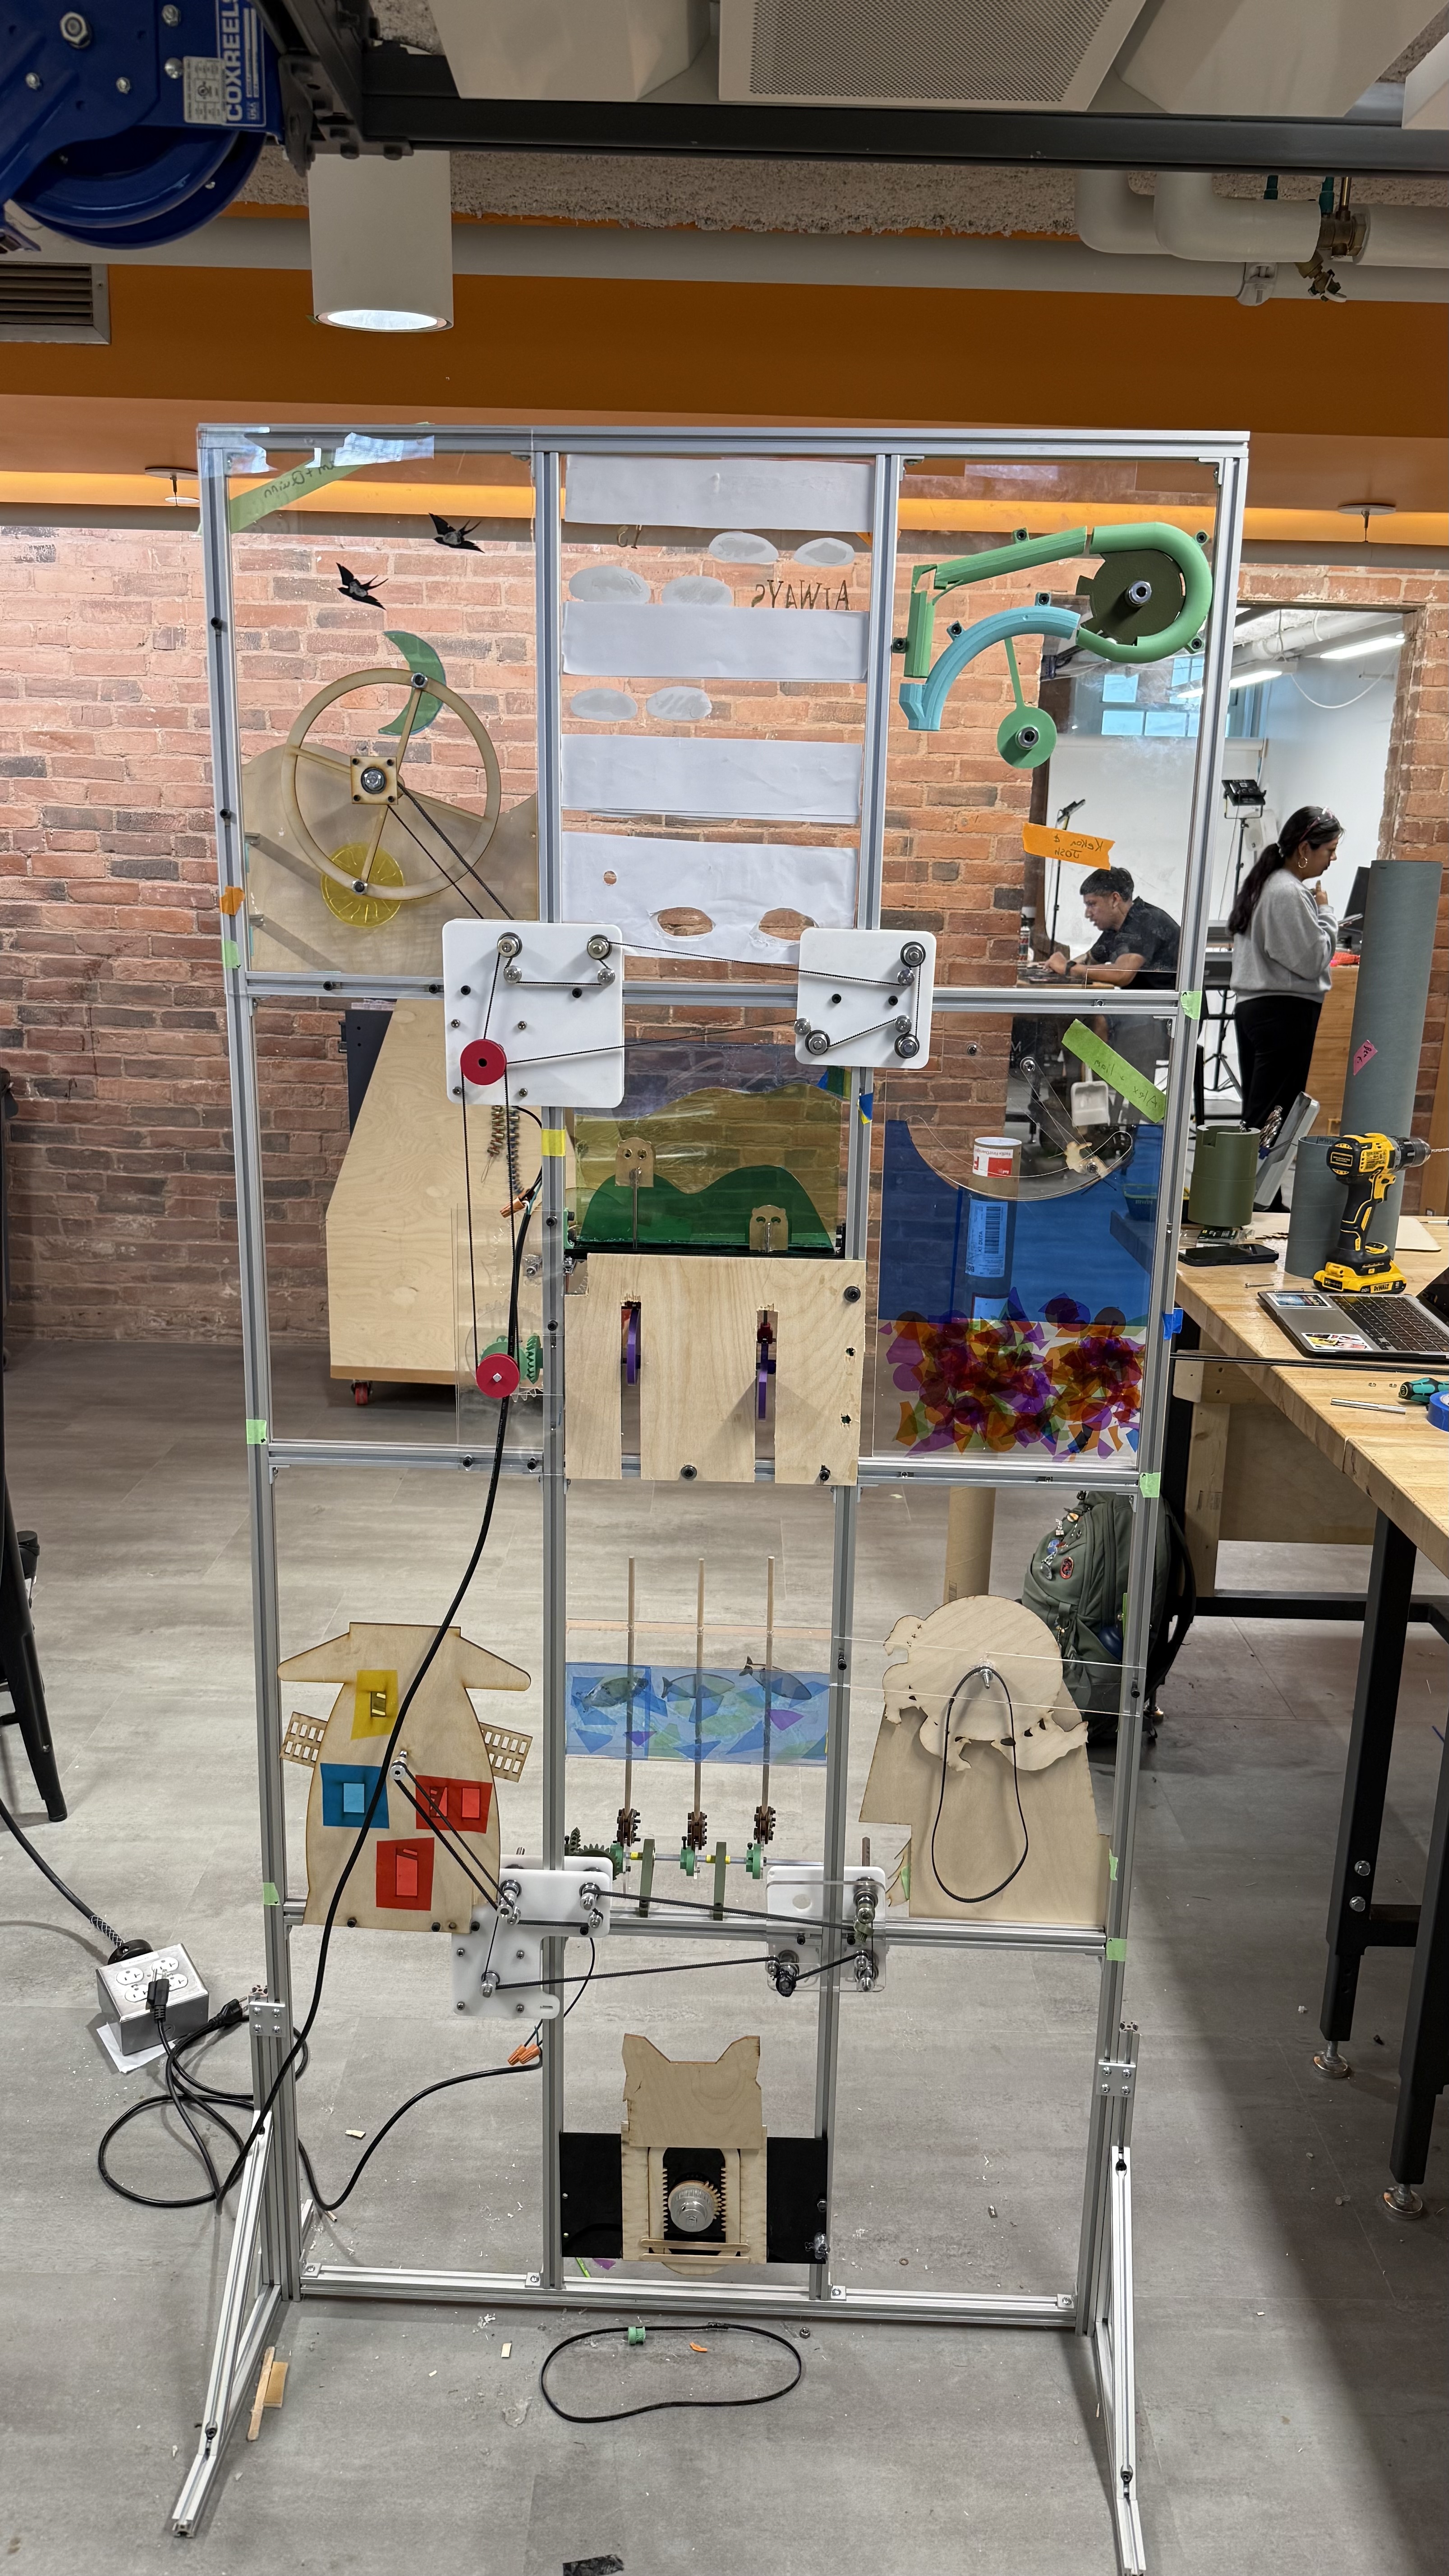
Px: Element of a 20ish-piece kinetic art installation #
With a partner of your choosing, build a 300 mm x 450 mm panel that has the following characteristics:
- it looks cool when viewed from one side,
- it connects to a shaft in one corner that, when slowly rotated with a torque of less than 0.1 Nm, makes its appearance change through purely mechanical means,
- it loads its shaft with nearly constant torque,
- it has no words, logos, or other explicit messages, and
- it is generally respectful of the workspace around it, i.e. no irritating bells or oozing liquids.
The panels, if you assent, will be installed in the panes of the windows of the Nolop red zone that face the SEC patio. Each panel will be driven by a gearmotor. The motors will slowly rotate, turning on at dusk and turning off at midnight. Passersby will be entranced by the luminous wonder you have created.
You will be given: #
- (Collectively as a class) a large metal frame with gearmotors and shafts attached
- Lots of colored cellophane
- Other mechanical components that you request
The exact dimensions and more subtle mechanical details will be more thoroughly specified by Tuesday, March 31.
Here is a mechanical drawing of the frame and drive system: https://cad.onshape.com/documents/304dd947cffe43999f775dbb/w/b5d019c1a5d10a4d9609d8b7/e/5b7bfcce3cf936338b9ad756
Px: Gravity-powered record player #
Build a gravity-powered record player. You can do this on your own or with a partner, if you feel like you’ll learn more working in a team. It should be able to play a 7" diameter record for 4.5 minutes at 45 RPM. If you decide you need a horn to amplify the sound, do not 3D print one. Instead, use paper, folded sheet metal, or the like. You might make a trigger mechanism that would start the record playing.
You will be given: #
- 1 vinyl record
- 4 or 5 steel needles
- As many bricks as you request, within reason
Please set your learning goals for the project on Canvas as soon as you have time.
A few pieces of advice #
As you think about your learning goals, it would be pretty safe to assume that all of you will be able to make a record spin. Sure, you might have a last-minute failure where some pulley comes loose on a shaft, but generally, you’ll get it.
You will probably also find that the sound of the needle is surprisingly audible, even with a hastily constructed paper horn for amplification.
For most of you, the major challenge of the project will be figuring out how to control the speed of the record so that it spins at a constant rate. If you have no method of speed control, your record player will start slow, then spin really fast for a few seconds, and then tail off dreadfully when the weight bottoms out. Having a low-friction system is also pretty important– it’s difficult to control speed if the thing is really difficult to spin in the first place. Actually playing for 4.5 minutes is a pretty ambitious goal, but can be done with a low-friction system. We’ll talk about modeling this in class.
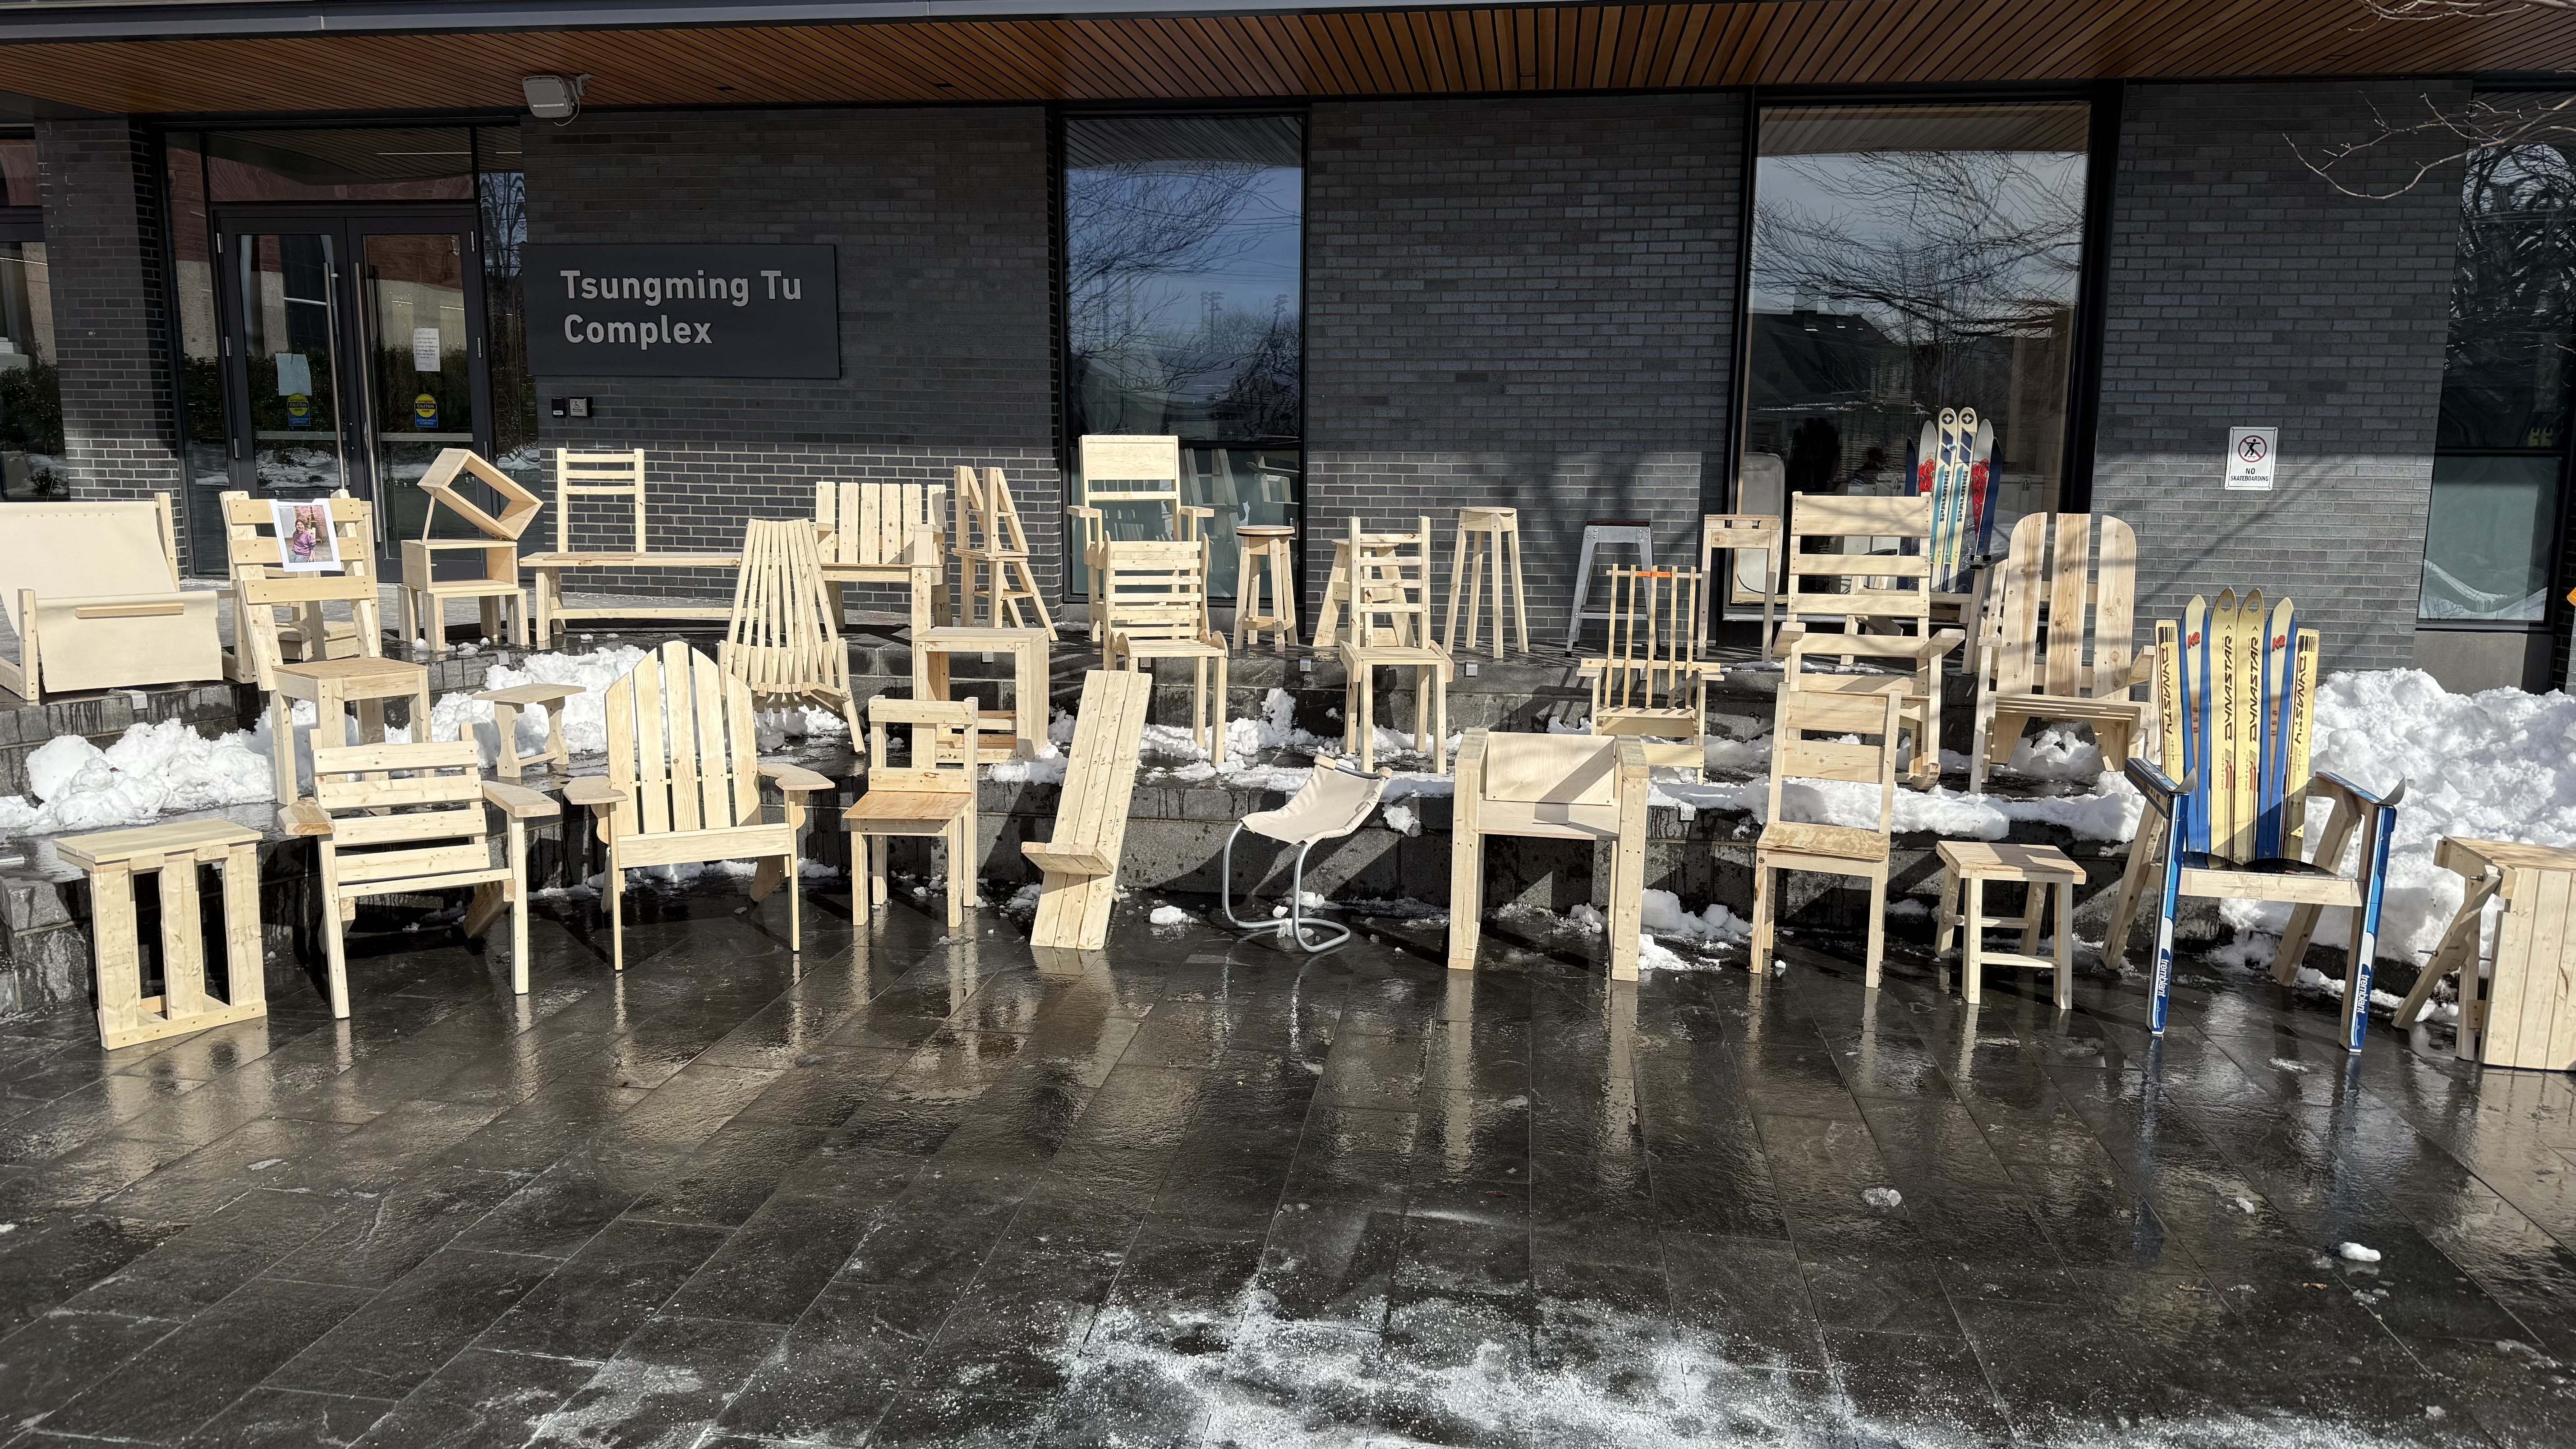
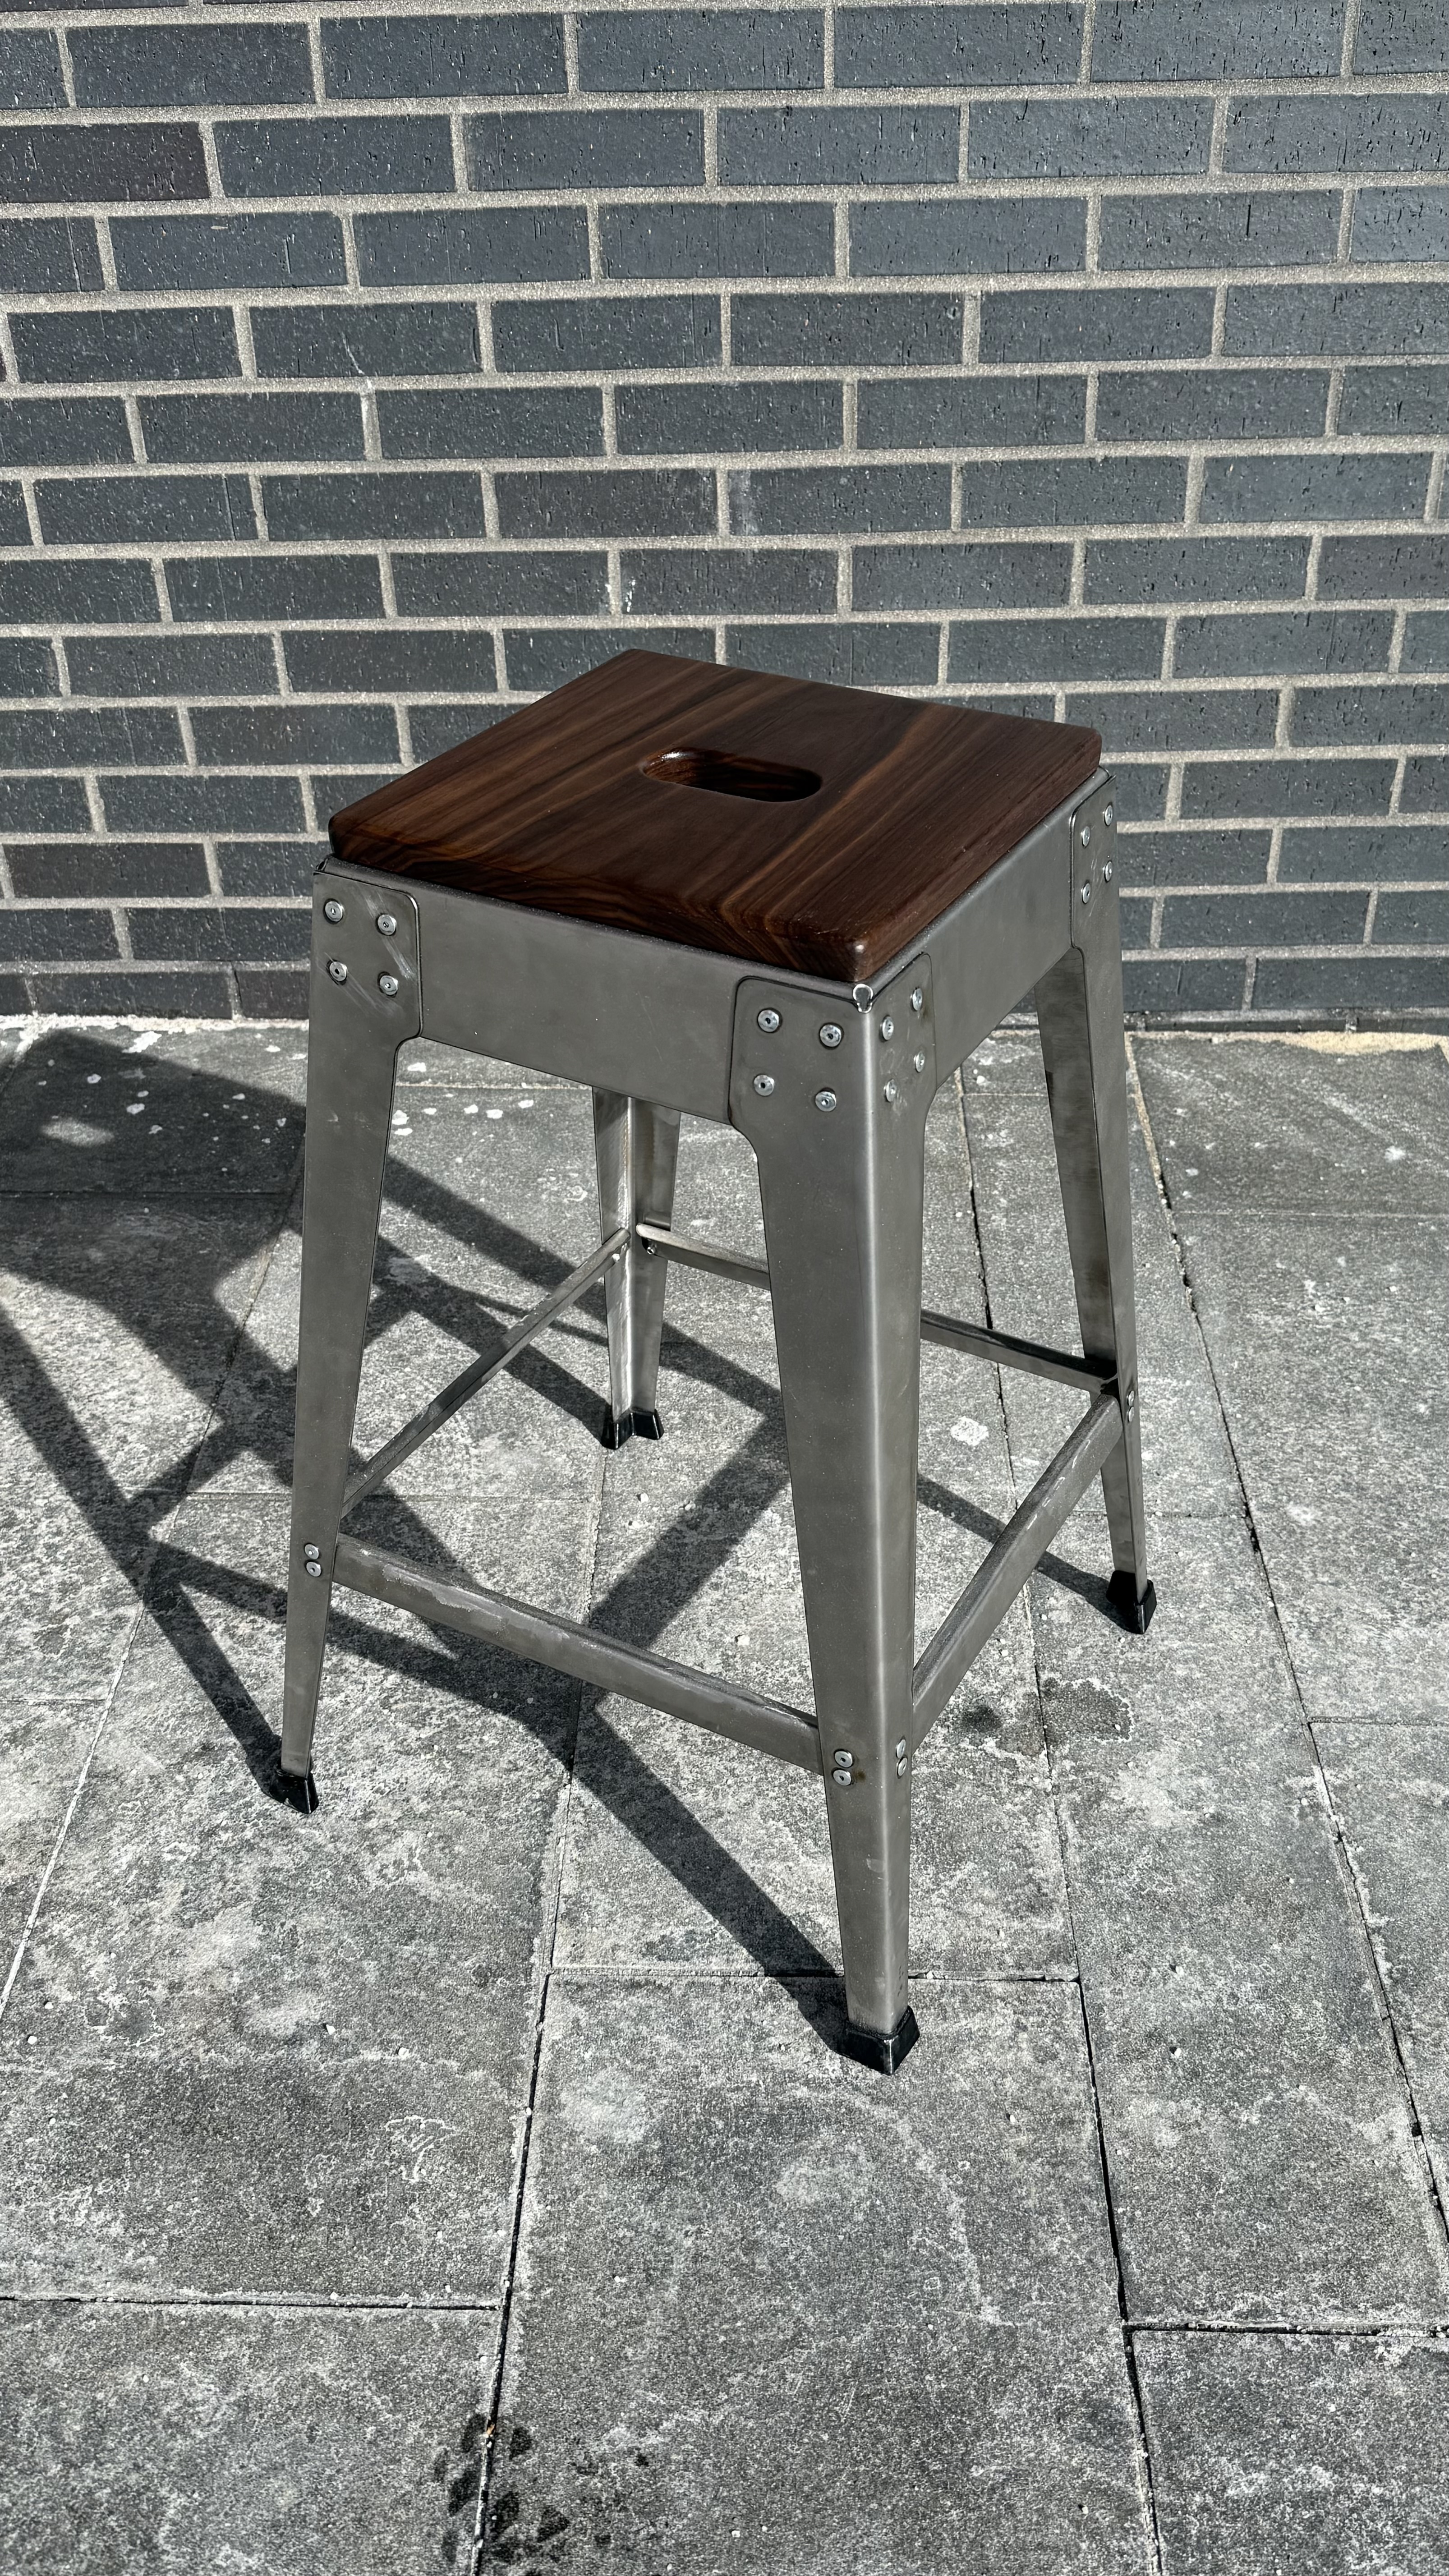
Px: Build a sturdy wooden chair #
Build a chair out of wood. If you prefer, you can use a different material or build a different piece of furniture that holds up a person’s weight.
You will be given: #
- 1 square of plywood, 15.5 inches on a side
- 2 2x4’s, each 8 feet long
- 1 1x4, 8 feet long
You can use any other wood you can find or buy, but don’t go buy a bunch of fancy wood. The idea here is not to make an heirloom, but to make a structurally sound chair with basic materials.
A few guidelines to help your learning:
- If you feel compelled to stain or paint your chair, please wait until after the due date and don’t do it in Nolop. (You should probably do it outside, but it’s probably too cold for that, which is why I’m trying to convince you not to do it.)
- Think about the loads that your chair will experience when you lean back in it or tip in any direction. Try to reinforce the legs and back so that they won’t break.
- Glue joint strength is proportional to surface area.
- In general, fasteners shouldn’t take load directly– they should hold load-bearing parts in place.
- If you feel the need to cut a 2x4 the long way, just use a 2x2 instead. We have a pile of those.
- We also have a pile of 2x6’s that are fair game.
Px: Build a mechanical car launcher #
Design, prototype, and refine a mechanism that can reliably hold and release a toy car with enough force to launch a toy car through a hoop.
The goal here is threefold:
- design a means to control a large force from a rubber band with a small force from your finger
- validate your design with mathematical estimates
- practice building a smooth mechanism
You will be given: #
- 1 ball bearing, 8 mm OD, 3 mm ID, 4 mm width, part number 693ZZ
- 1 piece of steel rod, 3 mm in diameter
- A pile of rubber bands, size 64
- 1 toy car for propulsion
You will need to obtain: #
- Probably some cardboard for prototyping
- Probably some plywood from the Nolop store for laser cutting
Deliverables #
For the second class, you should bring three things:
- A design for your car launcher in the form of a detailed drawing or CAD model
- Some mathematical calculations that suggest that your car launcher will propel the car to the right height
- Some kind of physical validation that suggests you are on the right track, like a prototype or test mechanism
For the final due date, bring your car launcher to class, and we’ll test them out. There will be cheers and groans.
By midnight on the due date, submit some documentation: a screenshot of CAD model or a picture of your drawings, a PDF of your calculations, and a picture of what you built. If you are proud of what you built, make sure that the picture makes it look good.
Px: Folded mask or costume #
Make a 3D folded mask or costume. It need not be laser-cut, but you must make a CAD model that shows the mask or costume in its folded and unfolded states. It should not be traced from an existing design of picture (unless you also drew the picture). It can cover just your face, or your whole head, but it should be 3 dimensional. It can be made of anything that folds: chipboard, thick paper, thin sheet metal, or anything else you can get. Ancillary decorations, like mustaches, are okay, but the core of the mask should be folded. It should be secured to your head somehow, so you can actually wear it.
One more requirement: You must make (and retain or document) three prototypes.
You will be given: nothing, but if you want thin aluminum sheet, we can get it by Friday.
Px: Human-powered vehicle (final project, 2022) #
Your mission is, as a team of 4, to build and test a human-powered vehicle that can traverse the course depicted in the diagram below. You start at the green line and end at the green star.
The vehicle should have the following qualities:
- It is piloted and powered entirely by 1 or more of your team members.
- It can carry a passenger (one of your team members) to the destination without damaging them.
- It makes traversing the course easier than dragging the passenger or carrying them like a backpack.
- While traveling, nobody onboard the vehicle should touch the ground.
- The vehicle should not require unusual balance or skill to pilot (no unicycles, pogo sticks, unstable monstrosities).
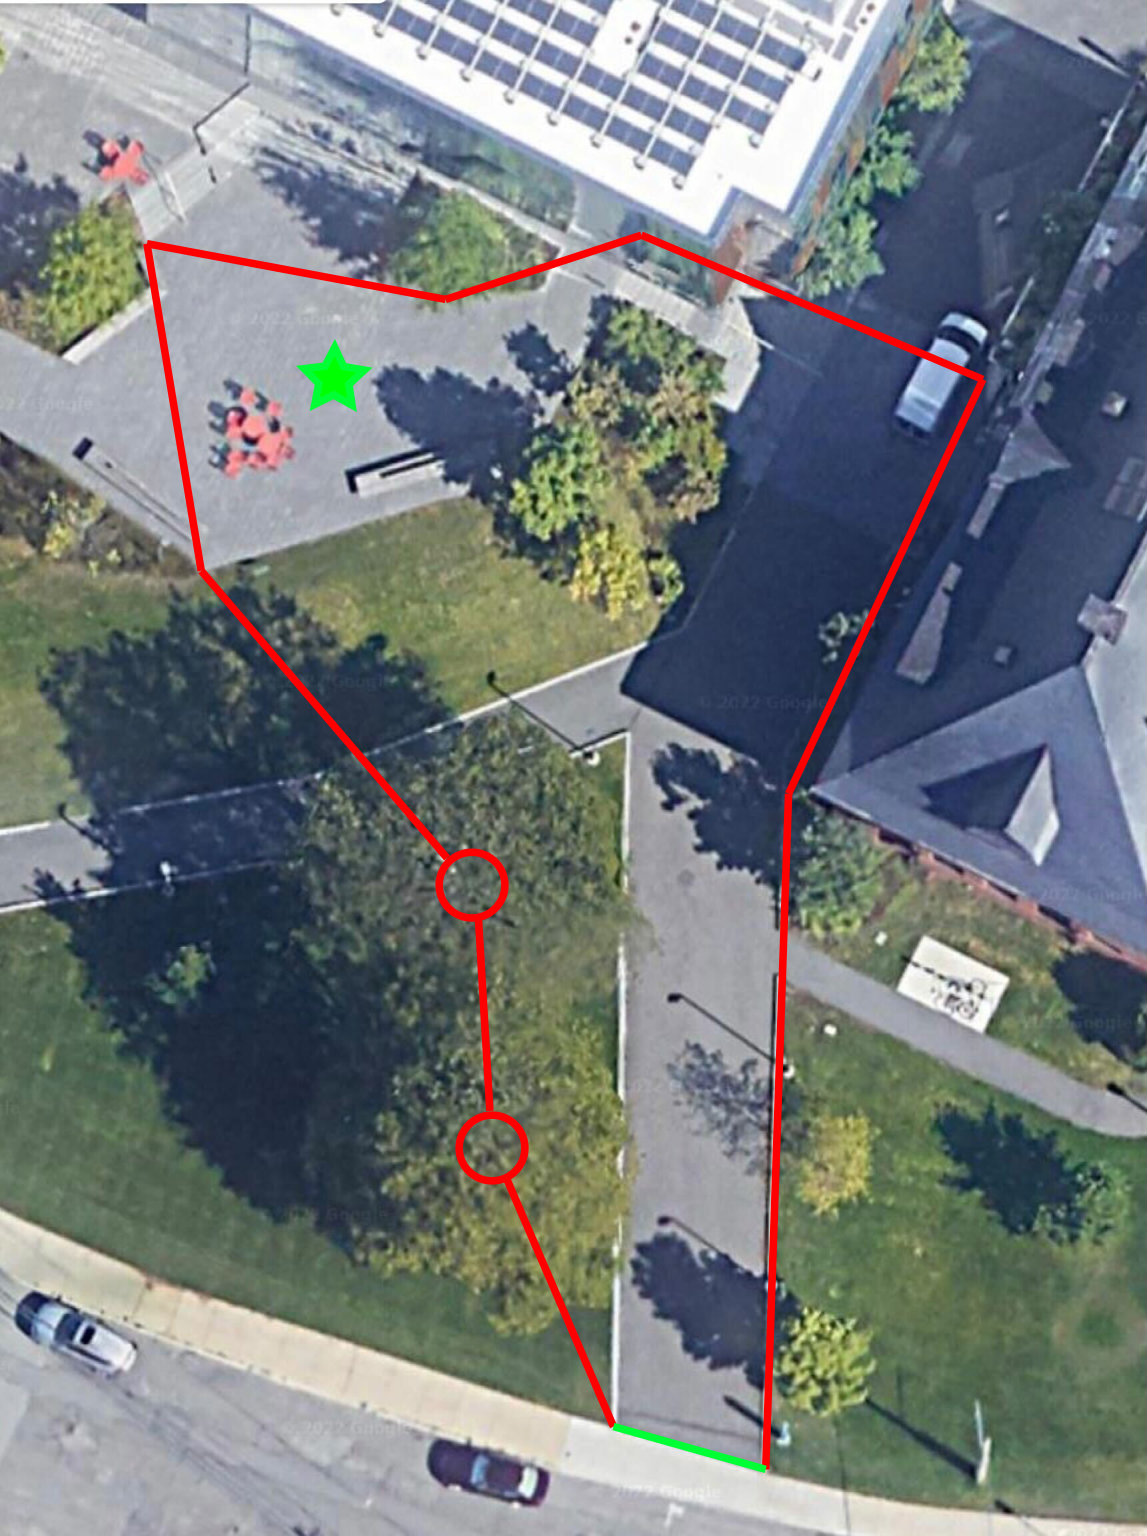
As usual, you should develop 1-3 learning goals for the project, in the usual format on Canvas. My goal is to give you the opportunity to work on an engineering challenge that is physically larger and likely involves higher forces than the smaller, desktop projects we’ve done so far.
Resources #
- Your team must spend at least $100 of Tufts’ money. To order stuff, post a message in the #designforfab channel in the Nolop Slack workspace. Brandon will order whatever you ask for. The upper limit is $150ish. You are welcome to buy more stuff if you want.
- 2x3 lumber will be available in the Nolop store for around $5/8 ft. Also, some plywood, 1/4", $10 per 2x4 ft panel. We also have lots of aluminum framing.
Px: Build a wind-powered car #
Build a small vehicle (less than 40 cm long) that can drive upwind without any source of energy other than the wind. We will use a fan for testing.
A few guidelines to help your learning:
- On the final vehicle, Lego gears are prohibited. You can use other Legos (wheels or whatever) if you want, but no Lego gears. This is to encourage you to learn how to design a gear, if you want to use gears. For prototyping, anything goes.
- If your design uses a propeller, do not 3D print a propeller, unless it is entirely of your own design. This is to encourage you to learn how to design a propeller.
- Your vehicle does NOT have to be a car. Wheels are cool, but other methods could also work, depending on your goals.
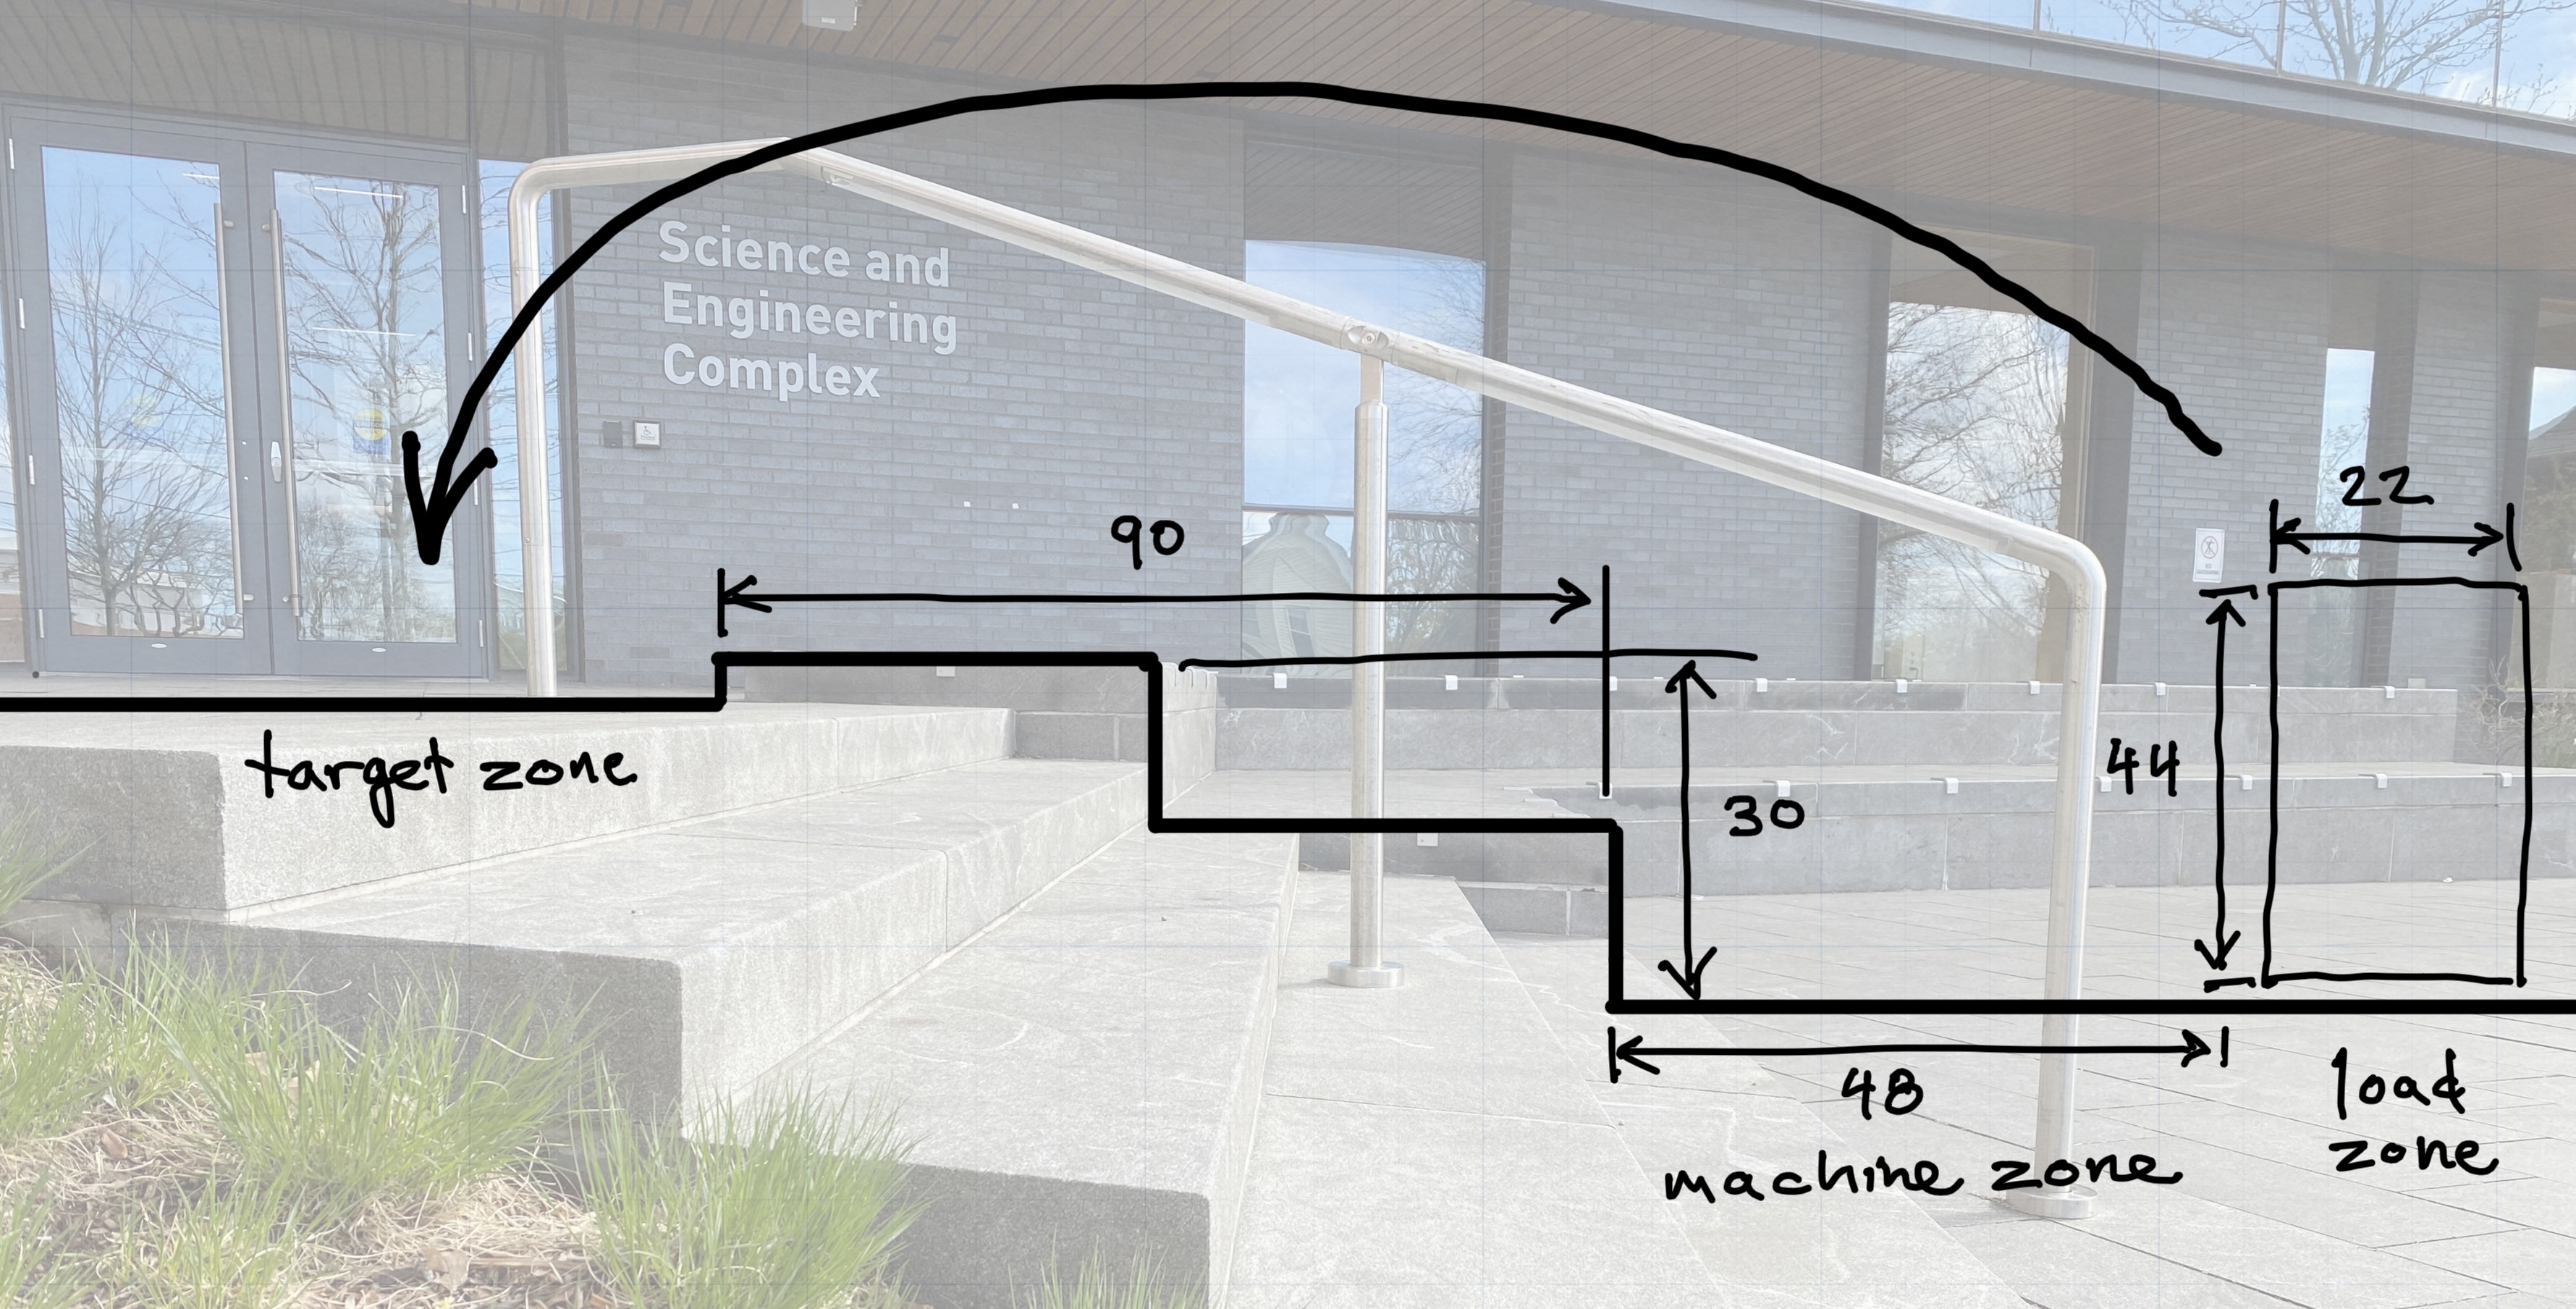
Px: Lifting machine #
Build a human-powered machine for lifting a cinderblock onto the “roof” of a “building.”
Your machine should have the characteristics listed below.
- Your machine must be operated by one person in your group.
- The operation of the machine should not rely on the operator’s strength in any substantial way– anyone in the class should be able to operate the machine, not just the strongest among us.
- Your machine should be stout enough to lift a plywood-capped cinderblock weighing around 30 pounds.
- You should not pre-attach straps or adhesives or anything like that to the load. This suggests that you will need to make some kind of end effector that can grip the cinderblock. Do not damage the cinderblock if you can help it.
- For safety, your machine should not lift the cinderblock above the operator’s body, lest it fall on them. Watch out for crushed feet too.
- The base of your machine must remain in the 48 inch wide zone next to the “building”.
- The cinderblock should be deposited in the lower level of the building roof.
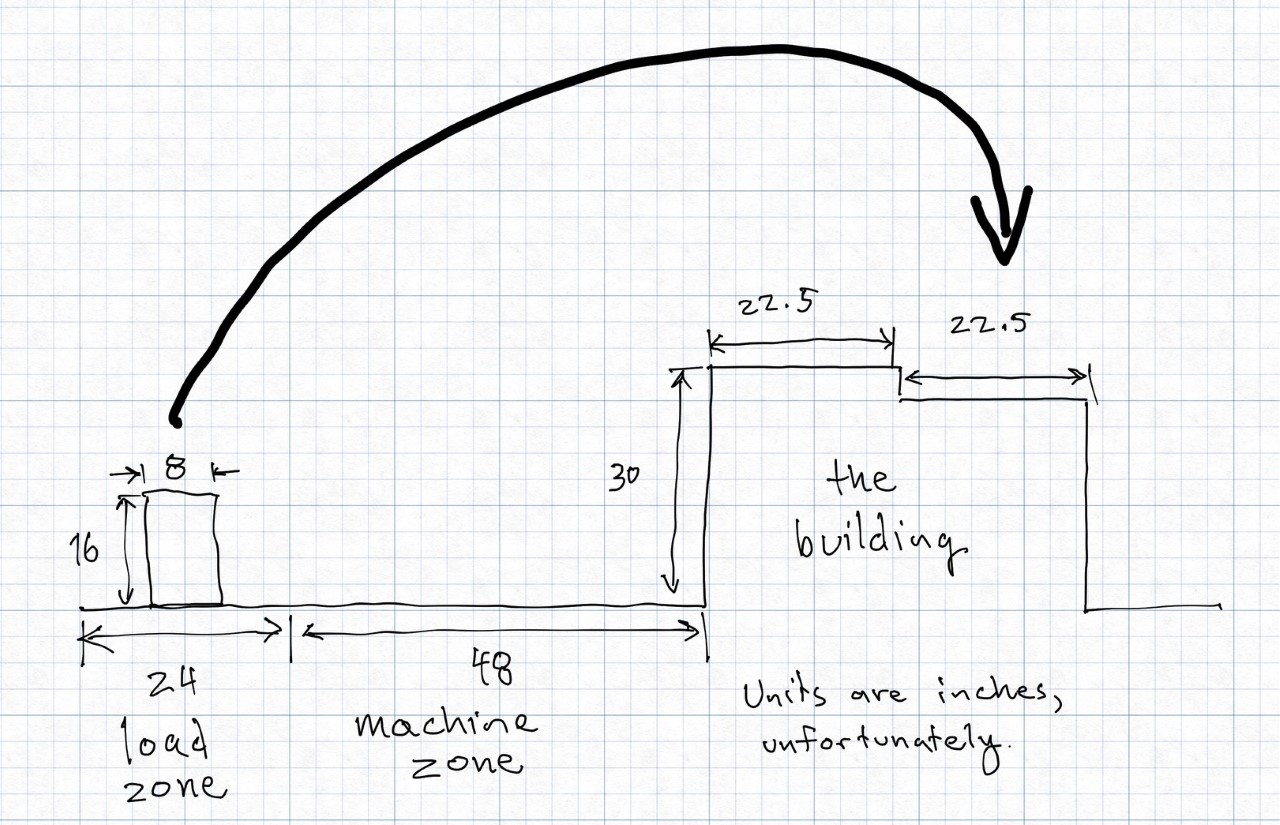
You will be given: #
- Access to a large pile of 1x4’s, 2x4’s, and 1/2 inch plywood
- If you decide to use a cable-driven mechanism, 1/16" steel cable
- As with the record player, as many bricks as you request, within reason
- Other materials or parts as needed
Px: Lifting machine 2.0 #
Build a human-powered machine for lifting a enclosure containing one of your team members from the lower patio to the upper patio of the SEC.
Your machine should have the characteristics listed below.
- Your machine must be operated by one person in your group.
- The operation of the machine should not rely on the operator’s strength in any substantial way– anyone in the class should be able to operate the machine, not just the strongest among us.
- Your machine should be stout enough to lift the enclosure containing your team member.
- You should not pre-attach straps or adhesives or anything like that to the enclosure. As in P5, you will need to make some kind of end effector that can grip the enclosure. Do not damage the enclosure if you can help it.
- For safety, your machine should not lift the enclosure above the operator’s body, lest it fall on them. Watch out for crushed feet too.
- The base of your machine must remain in the 48 inch wide zone on the lower patio.
- The enclosure should be deposited on the upper patio, at the same level as the top of the stairs.
You will be given: #
- Access to a large pile of 1x4’s, 2x4’s, and 1/2 inch plywood
- If you decide to use a cable-driven mechanism, 1/16" steel cable
- As with the record player, as many bricks as you request, within reason
- Other materials or parts as needed
A few notes about safety: #
- Before you test lifting a person in the box, try lifting the box filled with 6 cinderblocks (around 200 lbs, including the box).
- This is probably obvious, but if you can’t lift the box of cinderblocks safely, do not try to lift a person.
- Scissor clamps that rely on friction can require a lot of compressive force. If you’re using a scissor clamp, try to grip the top 3-6 inches of the box, where the box is sturdiest.
Px: Make a puzzle ball #
In a team of 3, design and fabricate a spherical puzzle similar to the Perplexus. Your puzzle should contain a total of at least 15 puzzle stages. Each team member should fabricate at least 5 stages; each person’s stages don’t have to be contiguous.
You will be given:
- 2 steel balls, 9 mm in diameter: McMaster 9292K44
- 1 transparent plastic ball, approximate inner diameter 195 mm
Restrictions:
- Do not alter the big plastic balls. Do not drill holes in them or glue things to them. (This is for two reasons: I want to reuse them next year, but also, if you glue stuff in, you will very, very likely regret it. You need to be able to assemble, test, and then iterate. Adhesives do not iterate.)
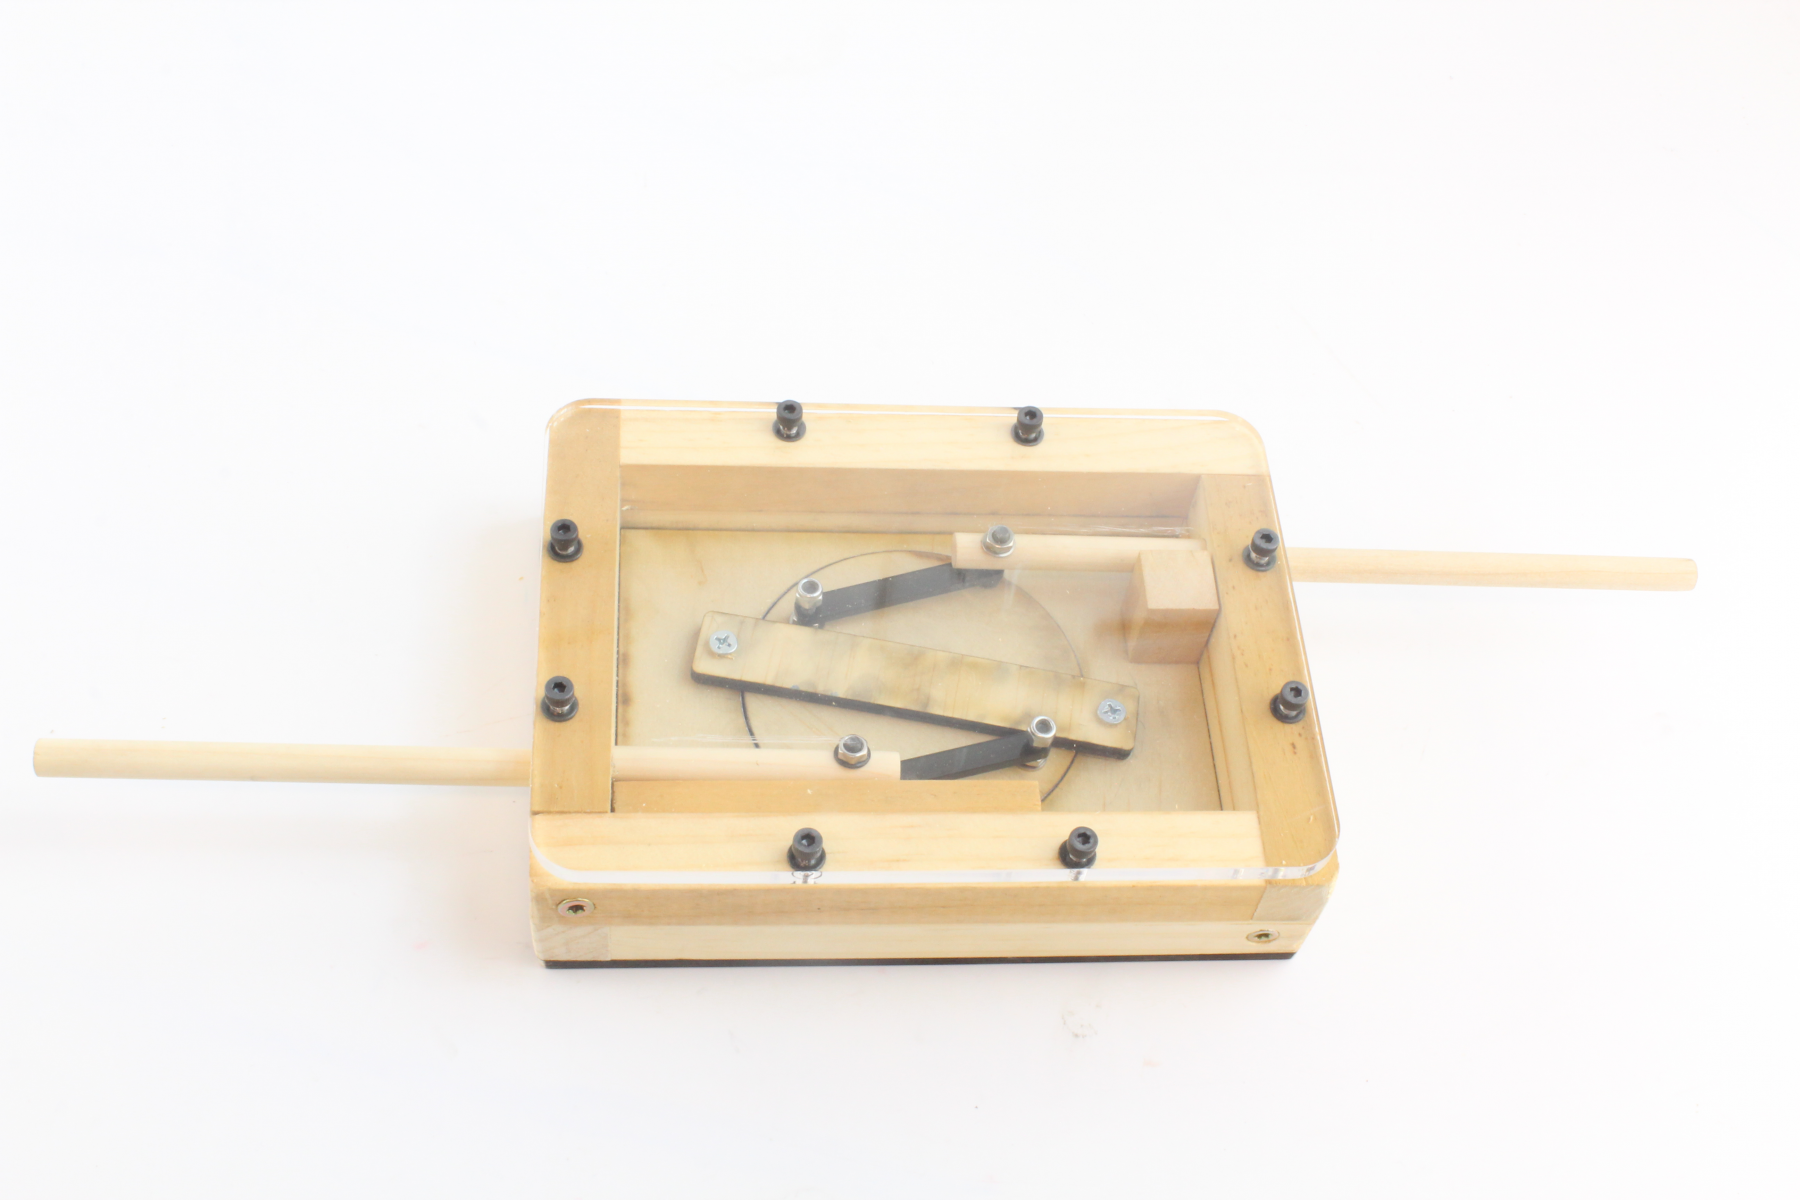
Px: Hidden mechanism box for kids #
Make a mechanism in a box that connects two opposing rods and survives exploration by kids. It should have the properties listed below.
- When you push rod A into the box, rod B moves into the box in a symmetrical fashion. When you pull A out, B emerges too.
- Rods A and B cannot be removed
- The top and sides of the box are opaque, hiding the mechanism. The top should not have visible fasteners if those fasteners would reveal the nature of the mechanism.
- The bottom is transparent, or in some way reveals the nature of the mechanism.
- The mechanism should be durable when exposed to kids.
- The mechanism should have a satisfying feel– this might mean detents, no rattling, or smooth motion, but it depends on the mechanism.
You will be given: 2 maple dowels, 3/8" in diameter and 8" long.
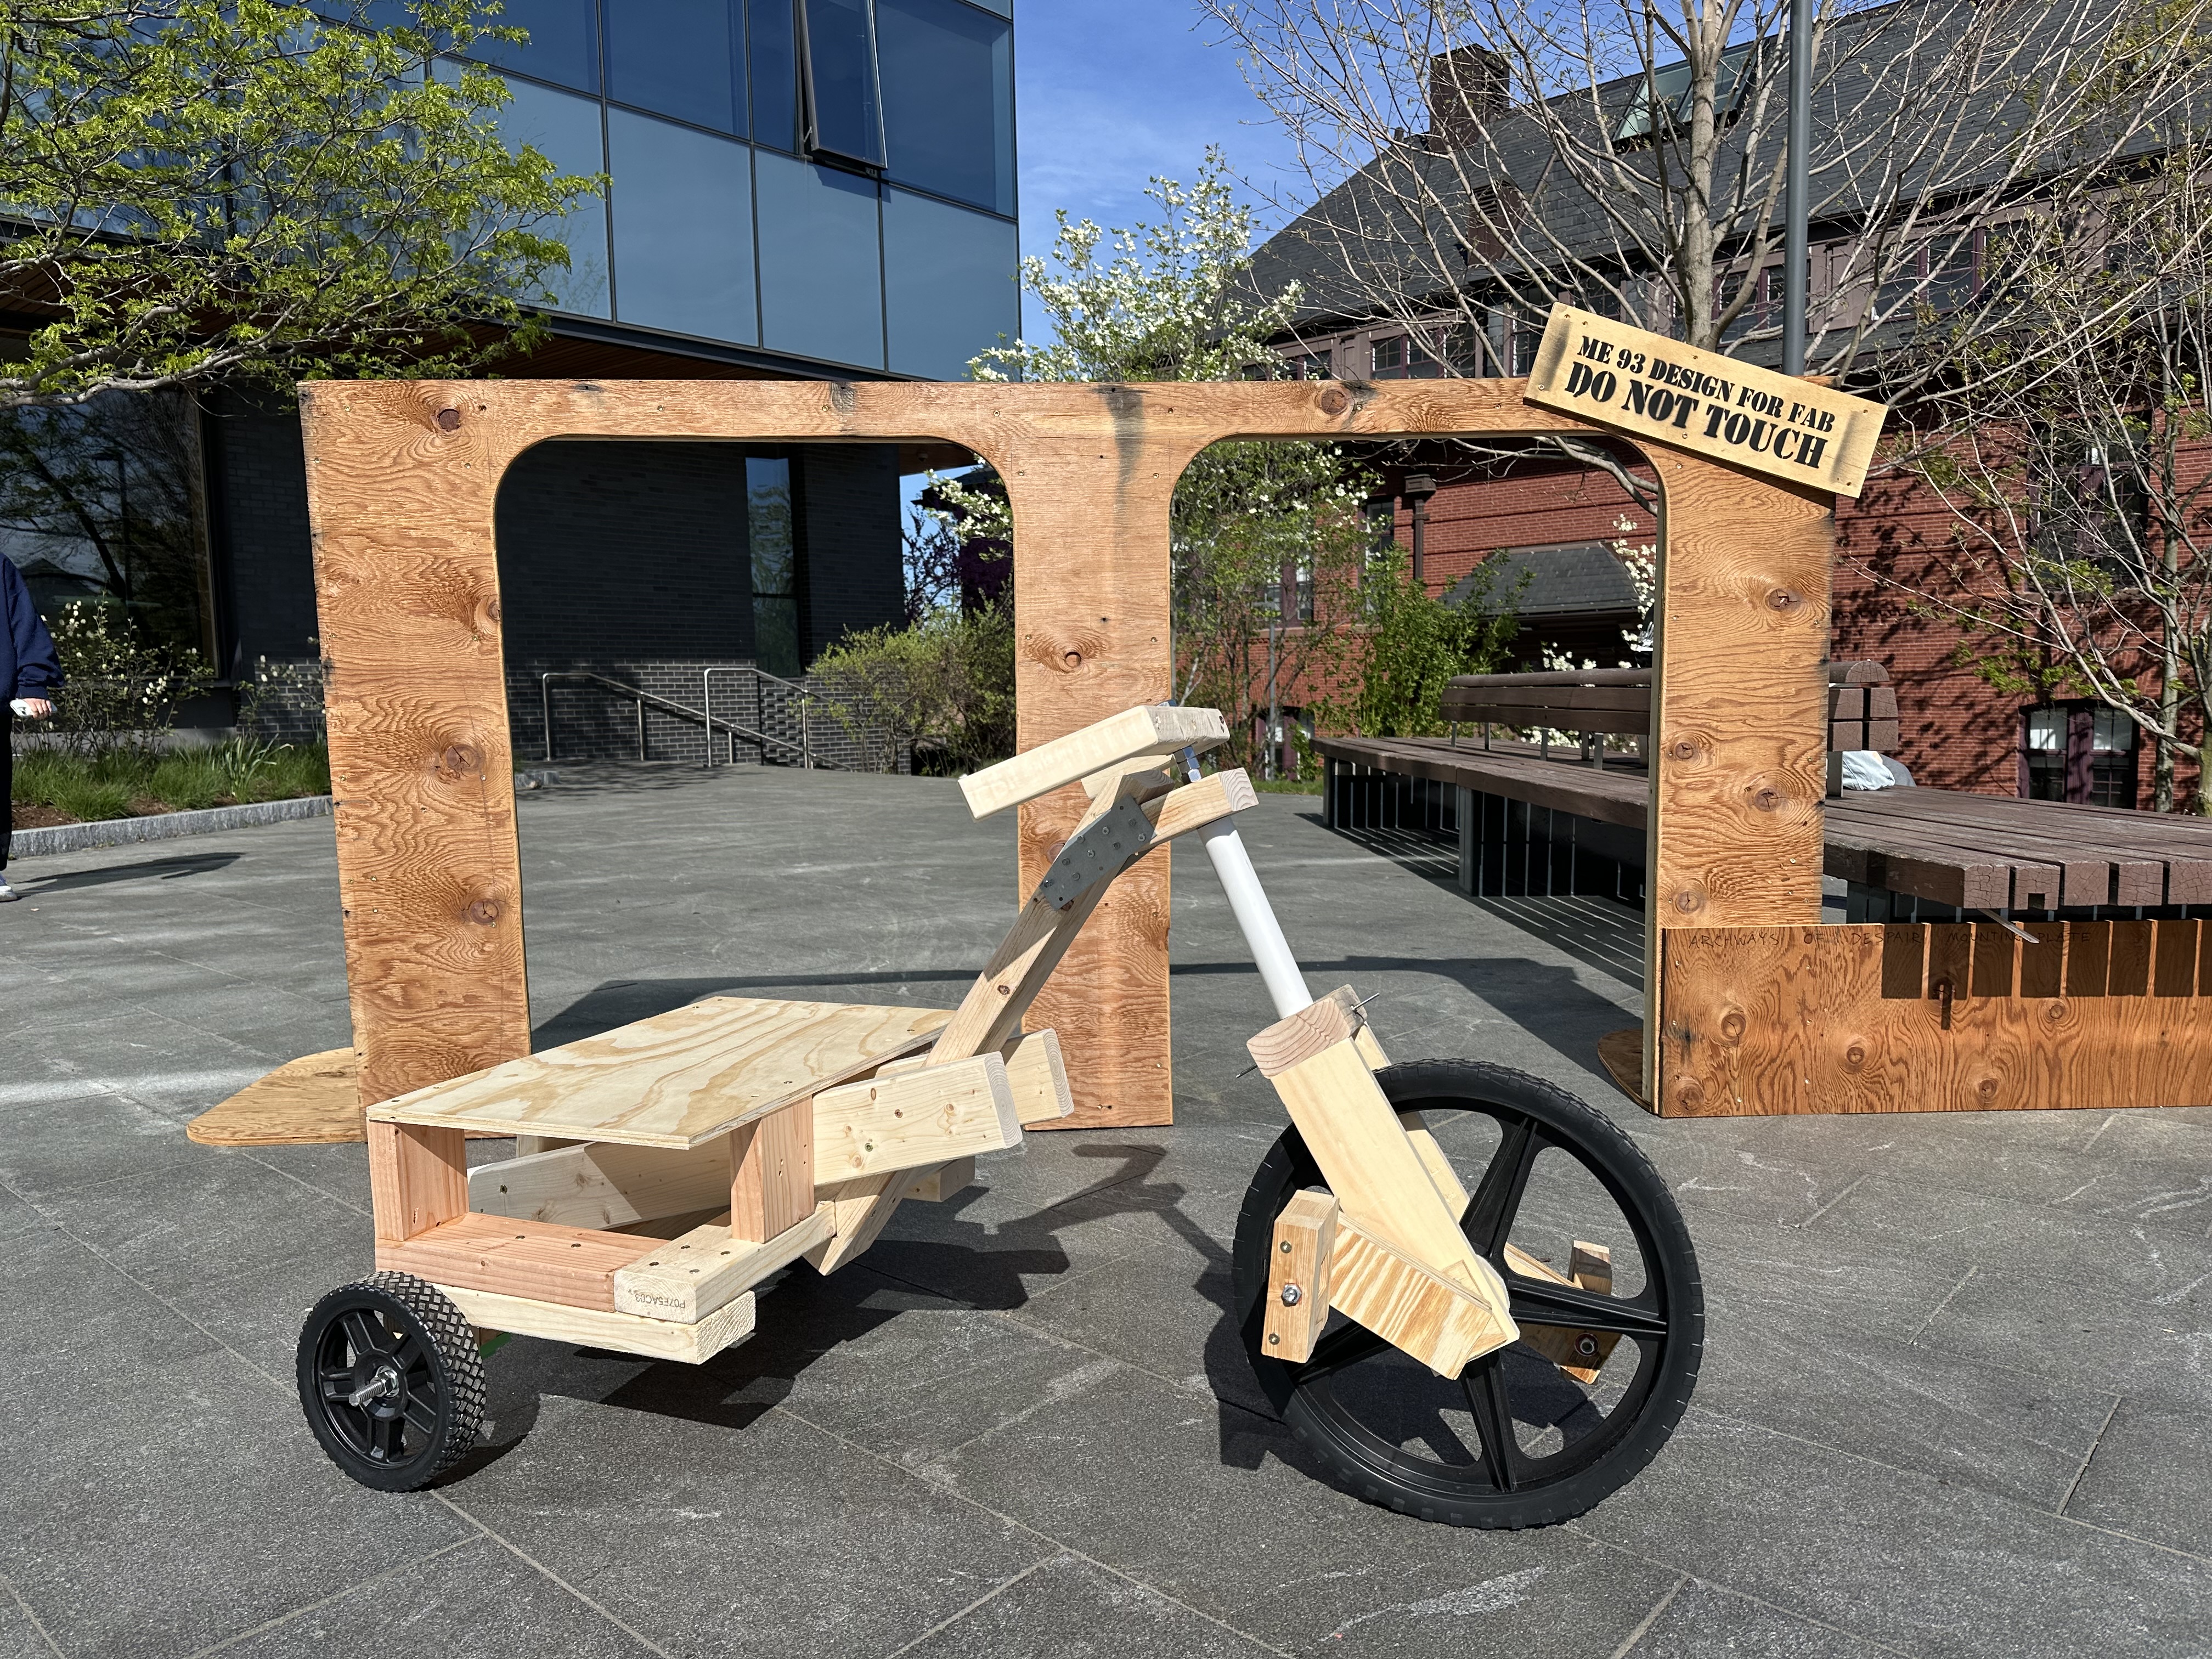
Px: Human-powered vehicle #
Your mission is, as a team of 2 or 3, to build and test a human-powered vehicle that can traverse the course depicted in the diagram below.
Your pilot and your vehicle start at the green line. In heats of 3 teams, your pilot and vehicle must complete 2 circuits of the course, finishing by traveling up the ramp back to the starting line. During each lap, your pilot and vehicle must pass through one of the Archways of Despair.
Anticipating 14-18 teams, we will probably have 3 rounds of single-elimination heats, where the victor of each heat progresses to the next round. For the final round, 3 laps of the course are required. To be clear: yes, these are races.
The vehicle should have the following qualities:
- It is piloted and powered entirely by 1 or more of your team members.
- While traveling, nobody participating in the race should touch the ground. Sneakers, gloves, and the like count as part of you. No Flintstone cars.
- The vehicle should not require unusual balance or skill to pilot (no unicycles, pogo sticks, unstable monstrosities).
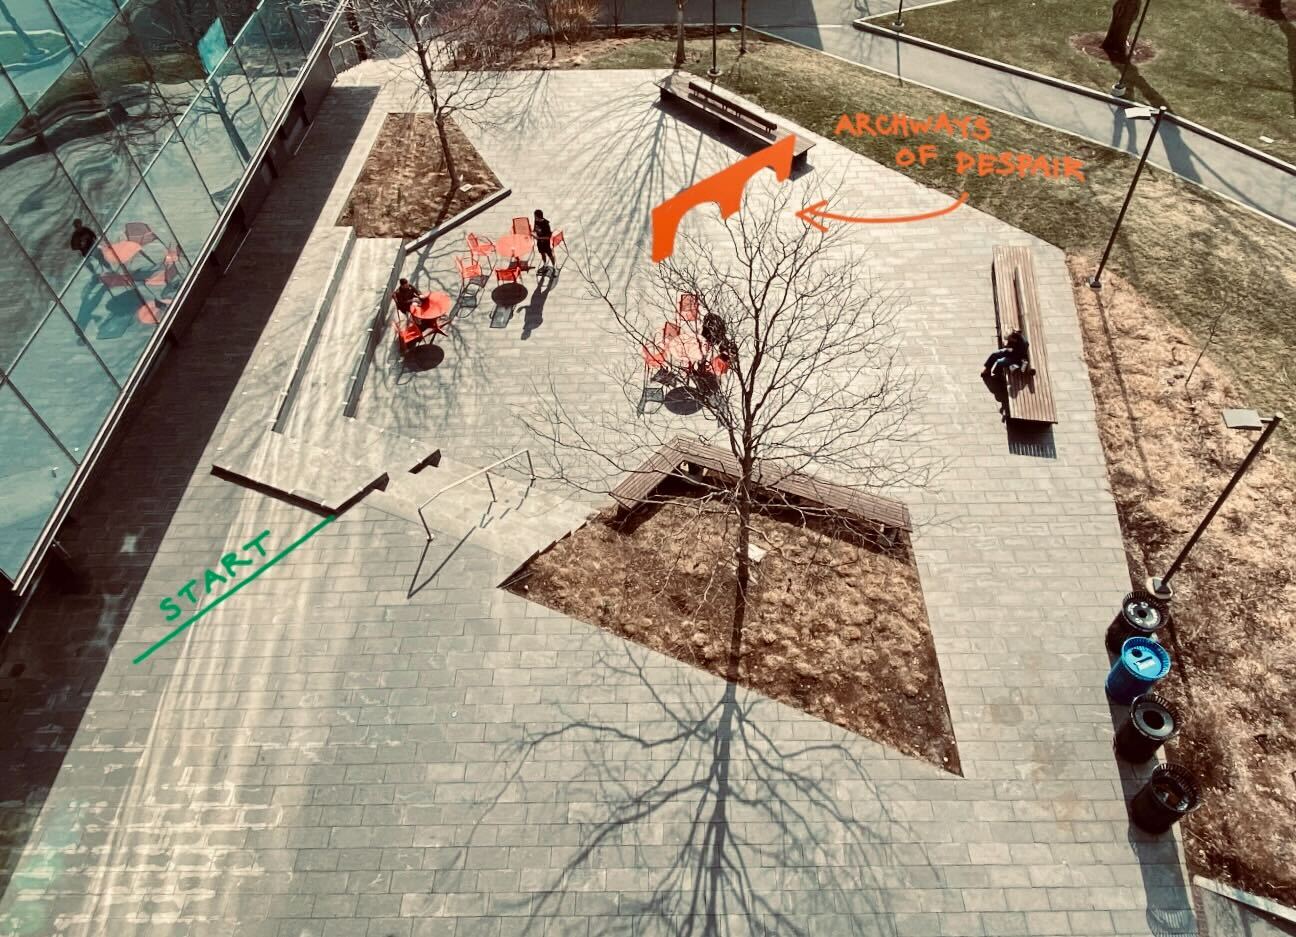
The archways of despair will be constructed of plywood and fixed to the bench in the area indicated. The two archways are sized identically. If all goes as planned, the Archways of Despair will be tastefully decorated and embellished by a third-party vendor (Arcadia).
As usual, you should develop 1-3 learning goals for the project, in the usual format on Canvas. My goal is to give you the opportunity to work on an engineering challenge that is physically larger and likely involves higher forces than the smaller, desktop projects we’ve done so far. You’ll have to deal with forces on the scale of your weight and the strength of your arms and legs; my hope is that this will expand your design instincts for the larger scale work that is common in industry.
Resources #
You will be given:
- 0-4 caster wheels, depending on how many your design needs
- 0-2 wheelbarrow wheels, 16 inches in diameter, depending on how many your design needs
- As much 1/2 inch steel rod as you need to make axles, within reason
2x4 and 2x3 lumber and 15/32 inch plywood will be available in the red zone by April 7. If there are additional materials that you need, please let Brandon know as soon as you can. Brandon/Hannah/Hannah’s truck will be making multiple Home Depot runs as the project progresses, but not at midnight. (Home Depot closes at 10 PM.)
Px: Build a sheet metal lamp #
Build a lamp out of sheet metal. The target here is two-fold: experience with sheet metal and experience with aesthetic design.
You will be given: #
- A sheet of 5052-H32 aluminum, 0.032 in thick, roughly 12 inches square
- A sheet of A1008 steel, 0.030 in thick, roughly 12 inches square
- An LED light bulb
- A light socket with a cord and switch
A few guidelines to help your learning:
- Aluminum is a lot more forgiving than steel. With aluminum, if you get a bend slightly off, you can probably still rebend it or tweak it a bit to make it fit. With steel, not so much.
- We have pop rivet tool in Nolop.
- We have two hand punches in Nolop.
- If you want to waterjet an intricate pattern, don’t. It will take forever and use a huge amount of garnet. Instead, search for “perforated metal” or “cloverleaf sheet.” You could split a sheet with a friend if it’s expensive. Home Depot has big sheets; Amazon has smaller stuff. You can also lasercut other materials as panel inserts.
Px: Build a wind-powered vehicle #
Build a small vehicle (less than 40 cm long) that can drive upwind without any source of energy other than the wind. We will use a fan for testing.
You will be given: #
- 1 hardened steel shaft, 4 mm diameter, 300 mm long (cut only with hacksaw, NOT bandsaw or shear!)
- 4 ball bearings, ID 4 mm, OD either 9 or 12 mm
- More ball bearings, if you need them
A few guidelines to help your learning:
- On the final vehicle, Lego gears are prohibited. You can use other Legos (wheels or whatever) if you want, but no Lego gears. This is to encourage you to learn how to design a gear, if you want to use gears. For prototyping, anything goes.
- If your design uses a propeller, do not 3D print a propeller, unless it is entirely of your own design. This is to encourage you to learn how to design a propeller.
- Your vehicle does NOT have to be a car. Wheels are cool, but other methods could also work, depending on your goals.
- Think carefully about tip speed ratio: https://mmpa.org/wp-content/uploads/2015/09/Tip-Speed-Ratio-Provided-by-Kid-Wind-PDF.pdf
- More technical info about wind turbine blade design from Erich Hau’s 2005 book, Wind Turbines. I would start by looking carefully at figure 5.10, and then going back to look at optimal tip speed ratio in figure 5.7.
- You might also be interested in this Javascript airfoil simulator. You could mess around with it to create an airfoil profile that maximizes lift/drag ratio, and then click the “geometry” button to get the XY coordinates of the profile, which you could then pull into Onshape.